Docker Agents
An Agent is any compute resource where a user’s containerized Workspace can be provisioned. The compute resource needs the Kasm Agent role installed.
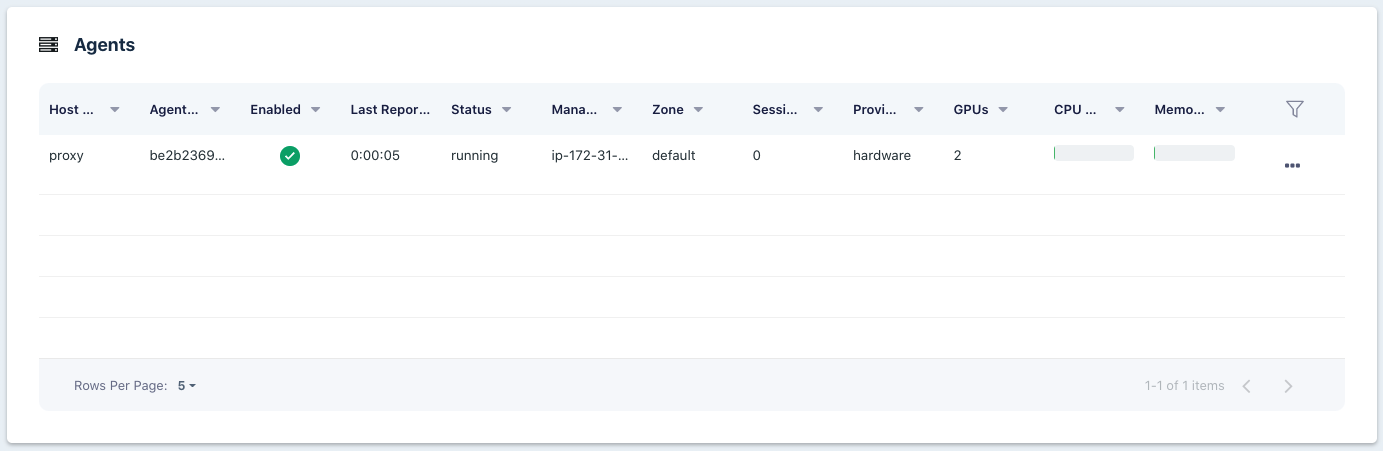
View Agents
View a list of Agents by selecting Infrastructure -> Docker Agents from the Kasm UI.

Agents List
More details about an individual Agent can be seen by clicking the Edit (pencil) icon under the Details and Usage tabs.
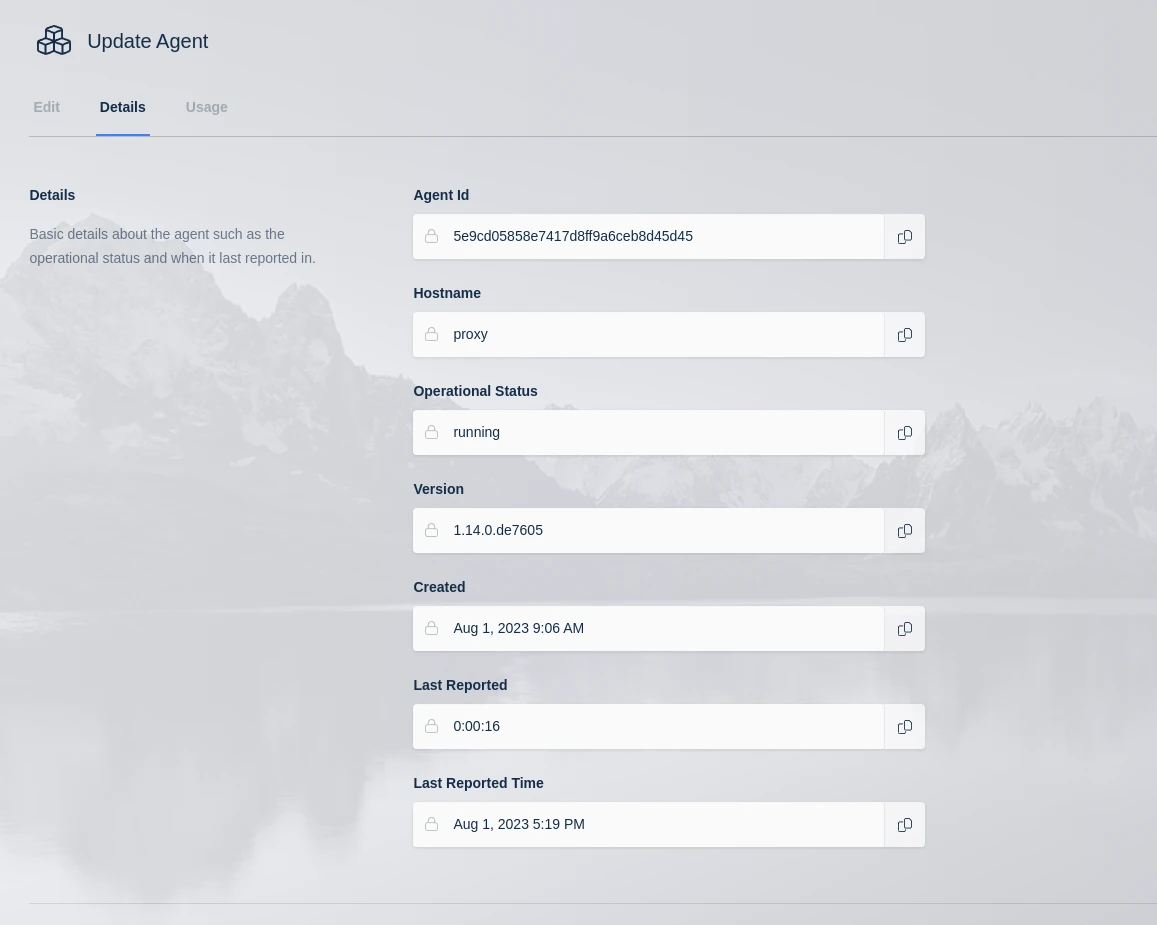
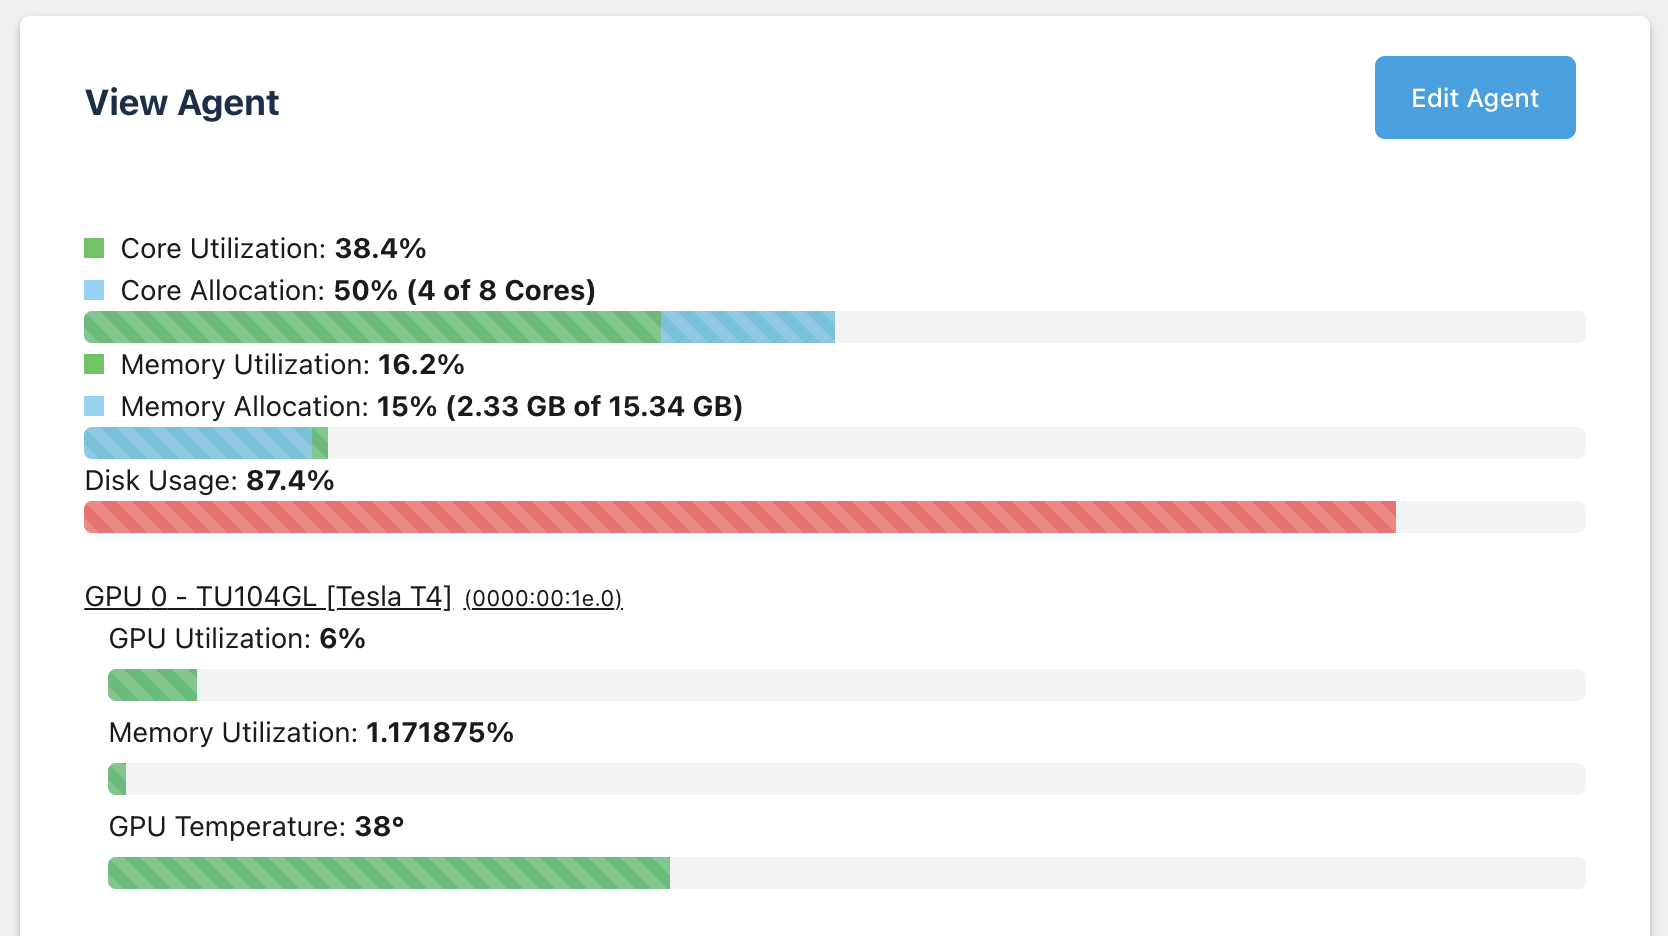
Agents Details
The bar chart shows two different stats for RAM and CPU respectively. It shows how much RAM/CPU is currently being utilized and it shows how much is currently allocated. If you have an agent that has 6 CPUs, is overriden to 12 CPUs, and has two desktops allocated, 1 at 2 CPUs and 1 at 3 CPUs, it will show 5 of 12 CPUs are allocated. It will also show what the current CPU utilization was during the last checkin.
Agent Chart
Historical CPU, Memory, and disk utilization can be tracked for an Agent by viewing the Dashboard in the Kasm UI.
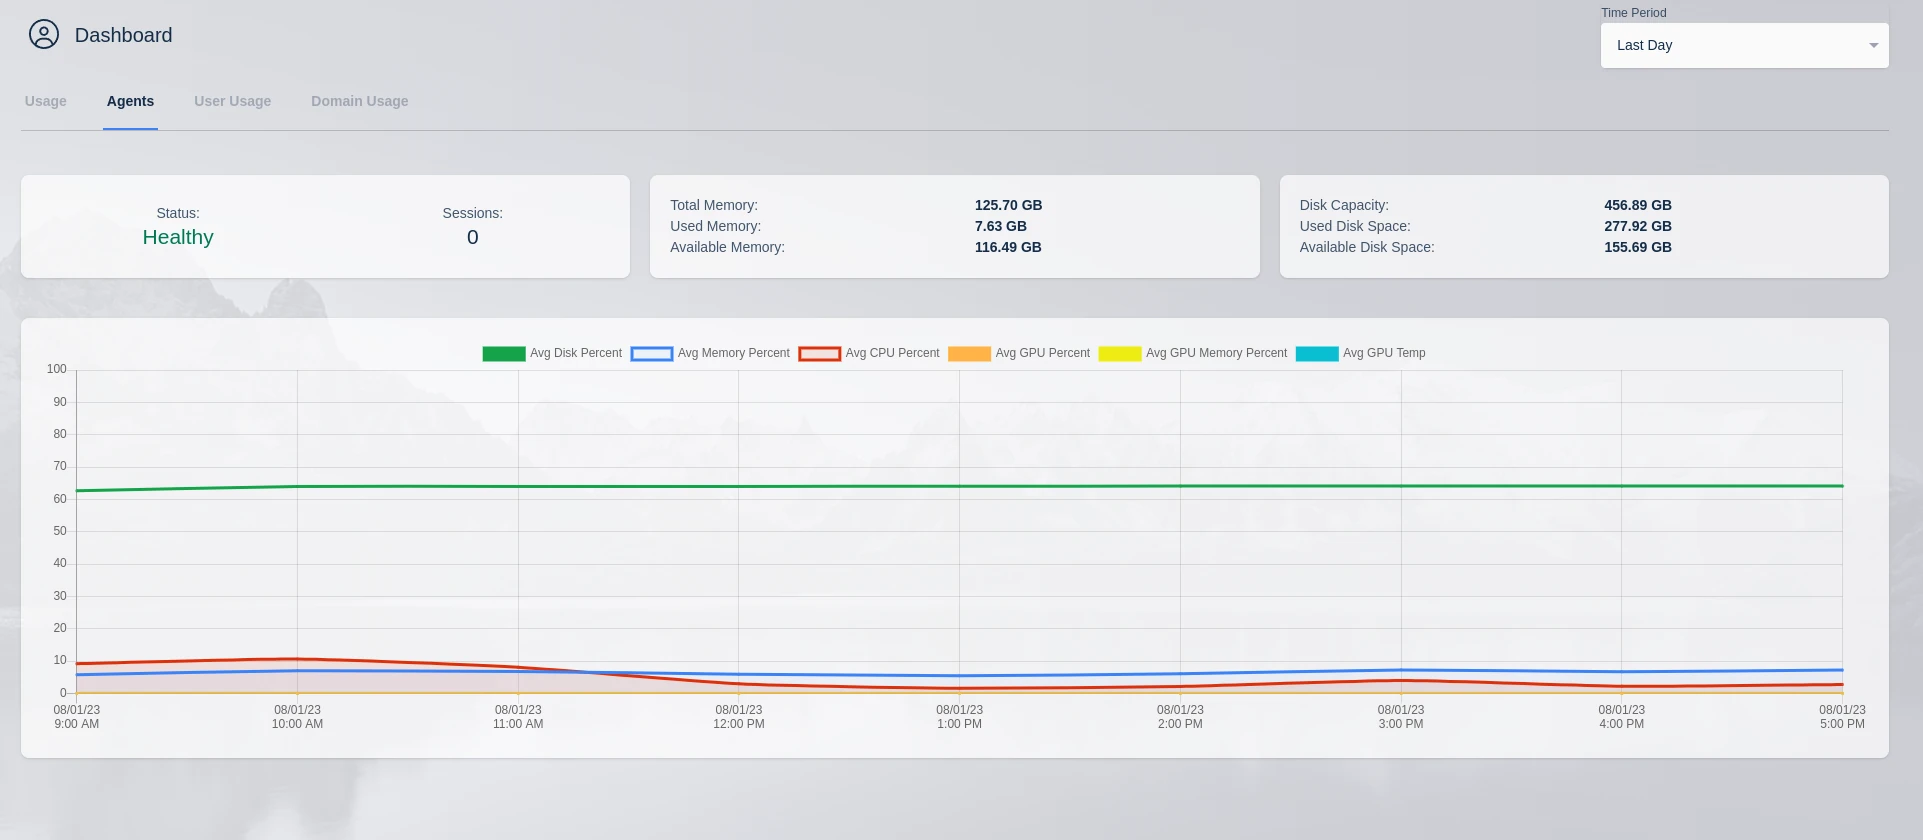
Agents Utilization Chart
Agent Settings
Agent settings may be configured from the Kasm UI by selecting Infrastructure -> Agents -> Edit (Pencil Icon)
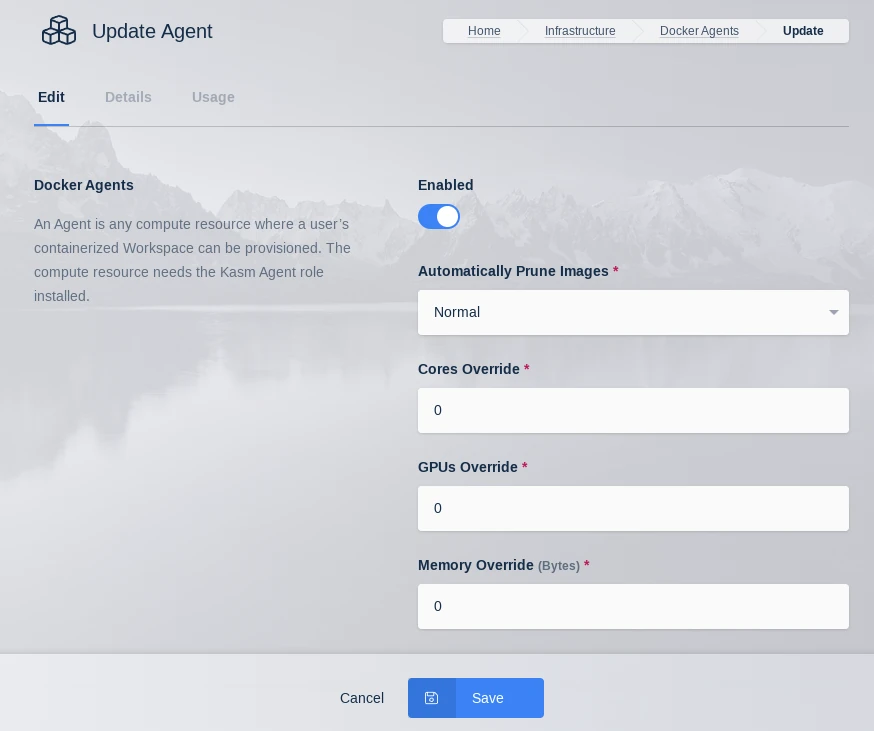
Update Agent
Enabled |
When checked, the Agent will service requests to create sessions. When disabled, the Agent will not be considered for requests to create more sessions. This is useful to “drain” sessions from an agent prior to maintenance. |
Automatically Prune Images |
Instruct the Agent to automatically delete (prune) unneeded images. Only Kasm Workspaces images are pruned. Off - Pruning is disabled. Normal - Prune untagged (dangling) images. Aggressive Prune untagged images and any image that is no longer defined in the application. |
Cores Override |
Instruct the system to treat the Agent as if it has this number of CPU Cores. This is useful to tactically oversubscribe the Agent. 0 indicates no-override. The system will use the actual CPU Cores of the system. |
GPUs Override |
Instruct the system to treat the Agent as if it has this number of GPUs. This is useful to tactically oversubscribe the Agent. 0 indicates no-override. The system will use the actual number of GPUs for the system. |
Memory Override |
Instruct the system to treat the Agent as if it has this amount of Memory (in bytes). This is useful to tactically oversubscribe the Agent. 0 indicates no-override. The system will use the actual memory of the system. |
CPU / Memory / GPU Override
An Agent reports how much RAM, CPU cores, and GPU resources are available on the system. If an Agent has 6 CPU cores and 6 GB of RAM and all Images are set to 1 CPU and 1 GB of RAM, only 6 sessions can be provisioned on the Agent at one time.
You can, however, override CPU, RAM, and GPU resources to allow for oversubscribing.
Here you are able to override the CPU, GPU, and RAM. A value of 0 means no override. If an agent server has 6 CPUs, you can, for example, configure an override of 12 CPUs. This would allow you to provision 12 instances of a user desktop, if each image was set to 1 CPU. The agent would still need 12 GB of RAM to provision 12 users if each image was set to 1GB of RAM. You can also override RAM in the same manner as CPUs. It is important to ensure your servers have a SWAP partition adequate in size to overcome over utilization of RAM. Not having a swap file can result in user desktops being destroyed when RAM is over subscribed. Overriding the GPU count allows the agent to assign more user sessions to a one or more GPUs. The system must have at least one physical GPU to override.
For both CPU and GPU override, the setting allows administrators to oversubscribe resources. However, it does not allow administrators to provide more resources to a single session than a system has. For example, if a system has 1 GPU and the GPU override was set to 10, that would allow 10 sessions requiring 1 GPU each to be created. The system, however, will not allow an image set to 10 GPUs to be assigned to an agent that has only 1 physical GPU, even of an override of 10 GPUs is used.
GPU Support
Workspaces supports passing through NVIDIA based GPUs to streaming containers. Workspaces utilizes the NVIDIA container toolkit. For a full list of supported GPUs and operating systems see https://docs.nvidia.com/datacenter/cloud-native/gpu-operator/platform-support.html. The NVIDIA drivers and container toolkit must be installed on all Workspaces Agent servers with GPUs intended to pass through to containers. GPUs can be used within a streaming container for a number of purposes, to include graphics, gaming, running applications that use CUDA, and developing with GPU accelerated frameworks such as Pytorch or Tensorflow. Using Workspaces allows organizations to easily manage and provide access to GPU backed resources. Follow the GPU How-To for a detailed walk through of a deployment.
Workspaces allows administrators to see how many GPUs an agent has.
Agent GPU Resources
Administrators can view the details of an Agent and see GPU statistics. GPU temperature is shown in celsius.
Agent GPU Details
Workspaces images allow defining GPU requirements. Set the number of GPUs this container should be assigned. A requested session using this image will only be provisioned on an agent that has the number of selected GPUs or greater.
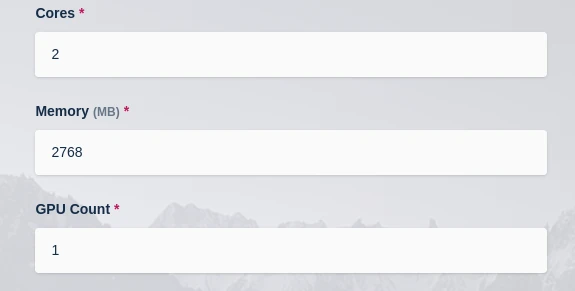
Image Settings
GPU Accelerated Graphics
You must use a Kasm maintained image that is built to support GPU accelerated graphics or a custom image that is based from one of these images using version 1.11.0 or higher. The following are the current images that support GPU accelerated graphics via EGL. All Kasm Workspaces images are available in Docker Hub and the code is open-source and available in GitHub.
kasmweb/core-ubuntu-focal
kasmweb/chrome
kasmweb/ubuntu-focal-desktop
kasmweb/chromium
Caution
The security of multi-tenant container GPU acceleration is not well established. This feature should be used with caution and with full understanding of the potential security implications. These features are being provided for by the GPU manufacturer and are merely being orchestrated by Kasm Workspaces. Kasm Technologies Inc provides no warranty of the security of such features provided by GPU vendors. Kasm Technologies recommends that GPUs not be shared between different security contexts and/or boundaries.
Changing Manager Token
An administrator may wish to change the token that Agents use to check into the manager. The steps outlined below will change the token on each of the agents and on the manager.
Warning
Changing the Manager token involves restarting Kasm services and will result in an interruption in service.
First, enter the Kasm Admin UI -> Settings -> Global and change the value of “Token” in the manager settings to your new desired token.
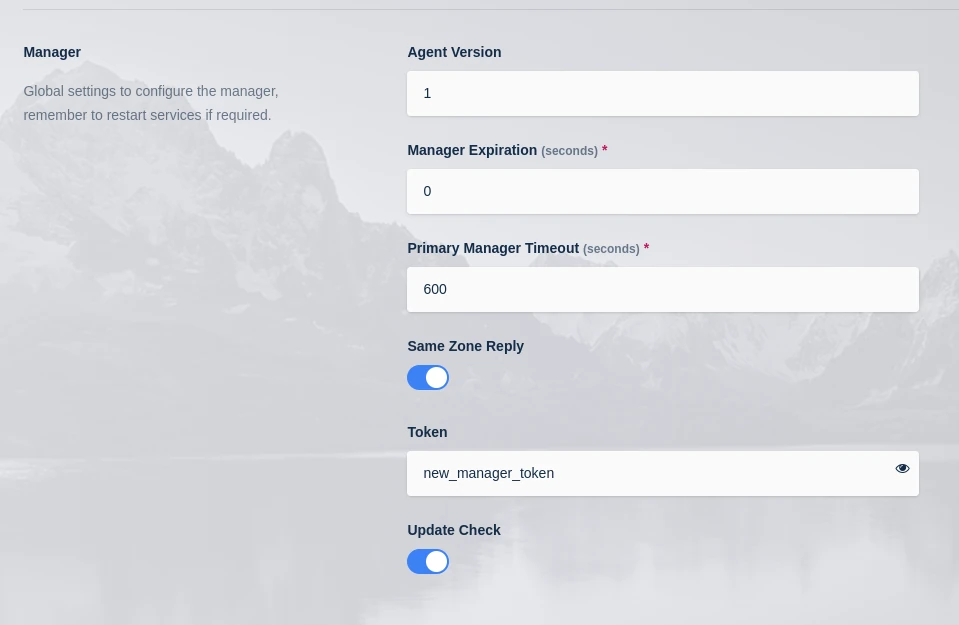
Manager Token Settings
Login to each server with the agent role and complete the following steps:
Stop the Agent Services
sudo /opt/kasm/bin/stop
Replace the value of ‘token’ in the agent config with the new manager token.
sudo vi /opt/kasm/current/conf/app/agent/agent.app.config.yaml
Start the Agent Services
sudo /opt/kasm/bin/start
After one minute the Agents should all be checked back into the Manager as shown in the “Infrastructure” -> “Agents” page in the Kasm Admin UI.