VMware vSphere AutoScale
Table of Contents
This guide will walk you through configuring autoscaling for Kasm Workspaces on VMware vSphere. Autoscaling in Kasm Workspaces automatically provisions and destroys agents based on user demand, ensuring optimized resource utilization and cost efficiency.
Prerequisites
Access to VCenter: Ensure you have admin access to your VCenter environment
Kasm Workspaces Installed: A basic setup of Kasm Workspaces must already exist
Understand Key Concepts:
Zones: Logical groupings of Kasm services for geographical or organizational segmentation
Pools: Logical groupings of Kasm Docker Agents and Server Pools for load balancing
Plan Your Configuration:
Understand your deployment zone requirements
Have access to your Vcenter server details; target clusters, datastores, networks, etc.
Create template images for AutoScale to use
Setup your vSphere environment
Create an account
We recommend creating a dedicated VCenter user for use with Kasm AutoScale.
Go to “Administration” -> “Single Sign On” -> “Users and Groups”
Choose the correct domain (e.g vsphere.local)
Click “Add”
Choose a username for your Kasm autoscale account (e.g kasm-autoscale)
Choose a password for your account
Click “Add” to create the account
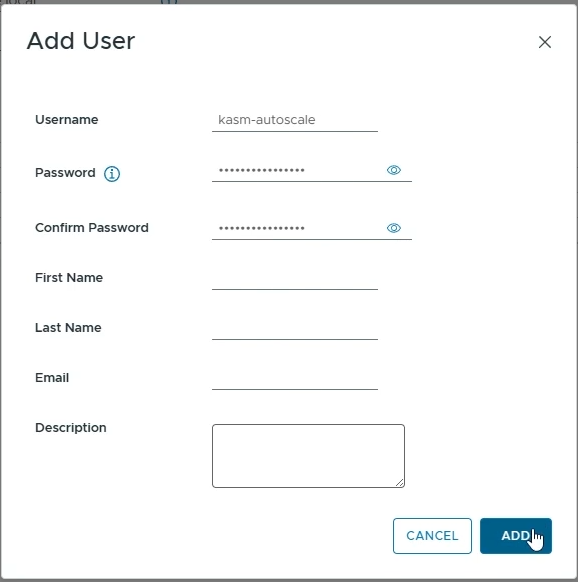
Create Kasm AutoScale user in vSphere
Create a Kasm AutoScale role
Go to “Administration” -> “Access Control” -> “Roles”
Click “New”
Name your autoscale role (e.g “Kasm Autoscale”)
Assign these necessary permissions to your role
Datastore
Allocate space
Browse datastore
Global
Cancel task
Network
Assign network
Resource
Assign virtual machine to resource pool
Virtual machine
Change Configuration
Change CPU count
Change Memory
Set annotation
Edit Inventory
Create from existing
Create new
Remove
Unregister
Guest operations
Guest operation modifications
Guest operation program execution
Guest operation queries
Interaction
Power off
Power on
Provisioning
Deploy template
Click “Create” to create your new role
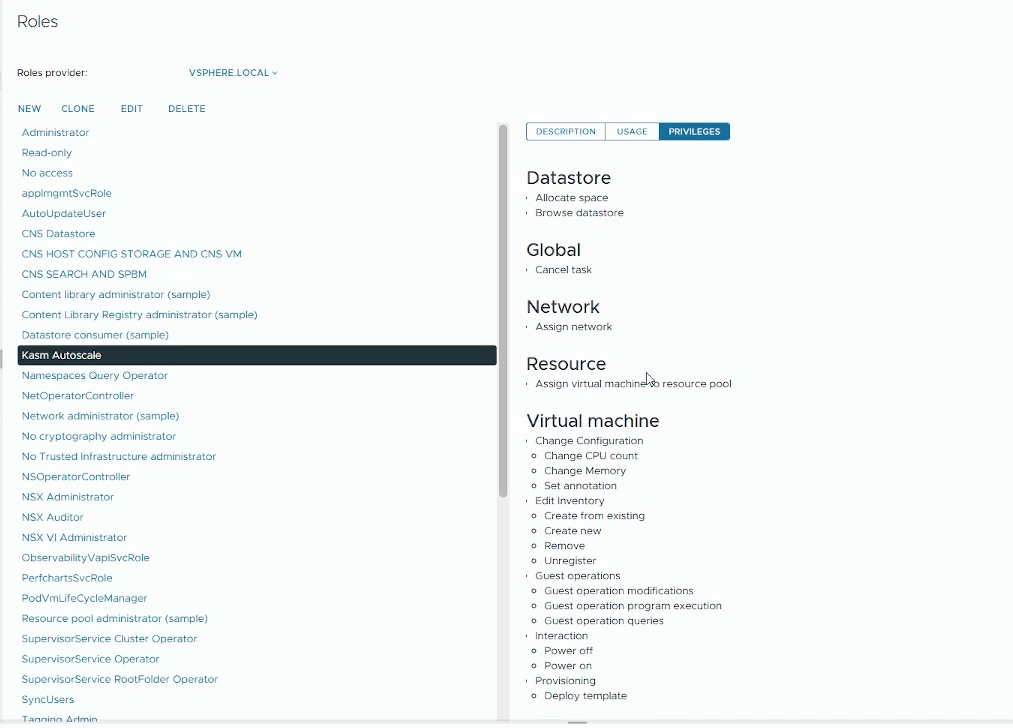
Create Kasm AutoScale role in vSphere
Assign Role to User
Go to “Administration” -> “Access Control” -> “Global Permissions”
Click “Add”
Domain: Choose the right domain (e.g vsphere.local)
User/Group: Choose the Kasm Autoscale user that you just created
Role: Choose the Kasm Autoscale role that you just created
Enable “Propagate to Children”
Click “OK”
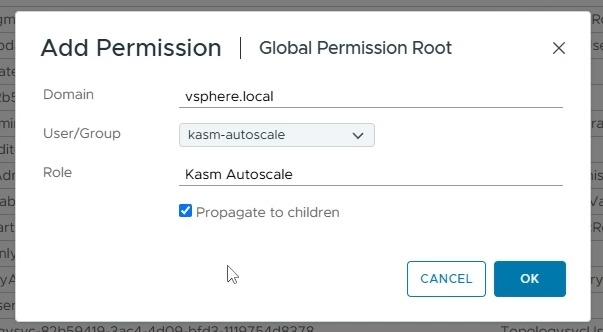
Assign AutoScale role to user
Create a VM template
- Create the appropriate VM template based on whether you are implementing Server AutoScaling or Docker AutoScaling on vSphere.
For Windows AutoScaling, follow the Windows Templating Guide
For Docker Agent AutoScaling, follow the Linux Templating Guide
Linux Templating
On your vSphere dashboard, go to your datastore and upload an ISO file of your Linux Image (you can create a new dedicated folder for storing ISO files). In this demo, we’ll use the Ubuntu Server 24.04.2 LTS image. If you prefer a different distribution, ensure it’s a supported operating system. Alternatively, if you have a pre-configured Linux template like a Cloud Image, feel free to use it instead.
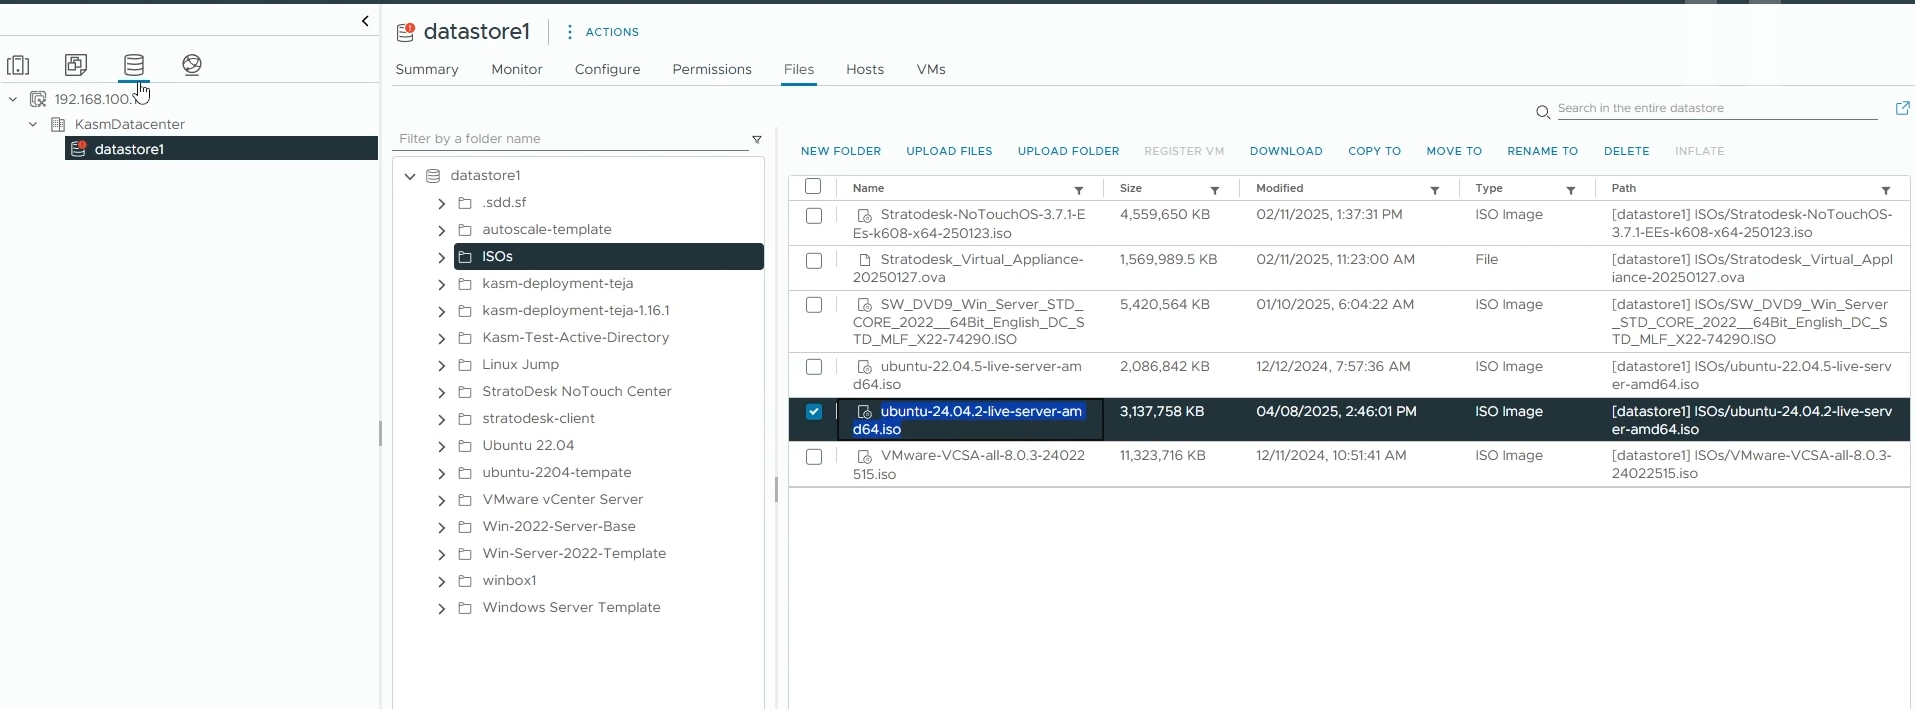
Upload Linux ISO image to your datastore
Go back to your Datacenter view, right-click on the datacenter where you want to create a VM and select “New Virtual Machine”
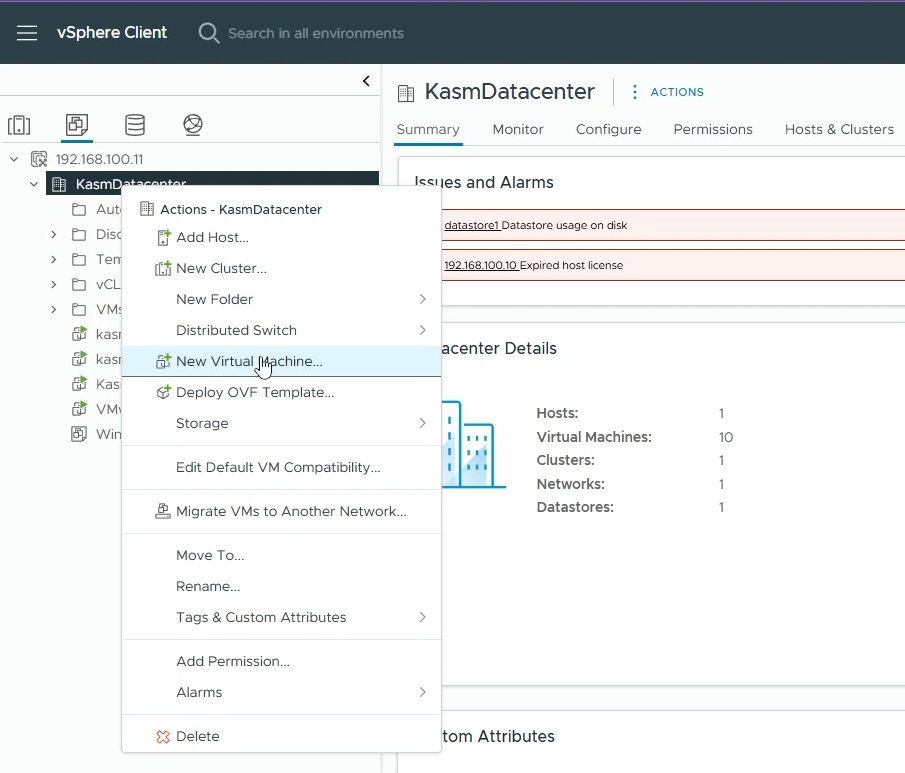
Right-Click on your datacenter and create new VM
Select a creation type
Choose “Create a new virtual machine” and click “Next”
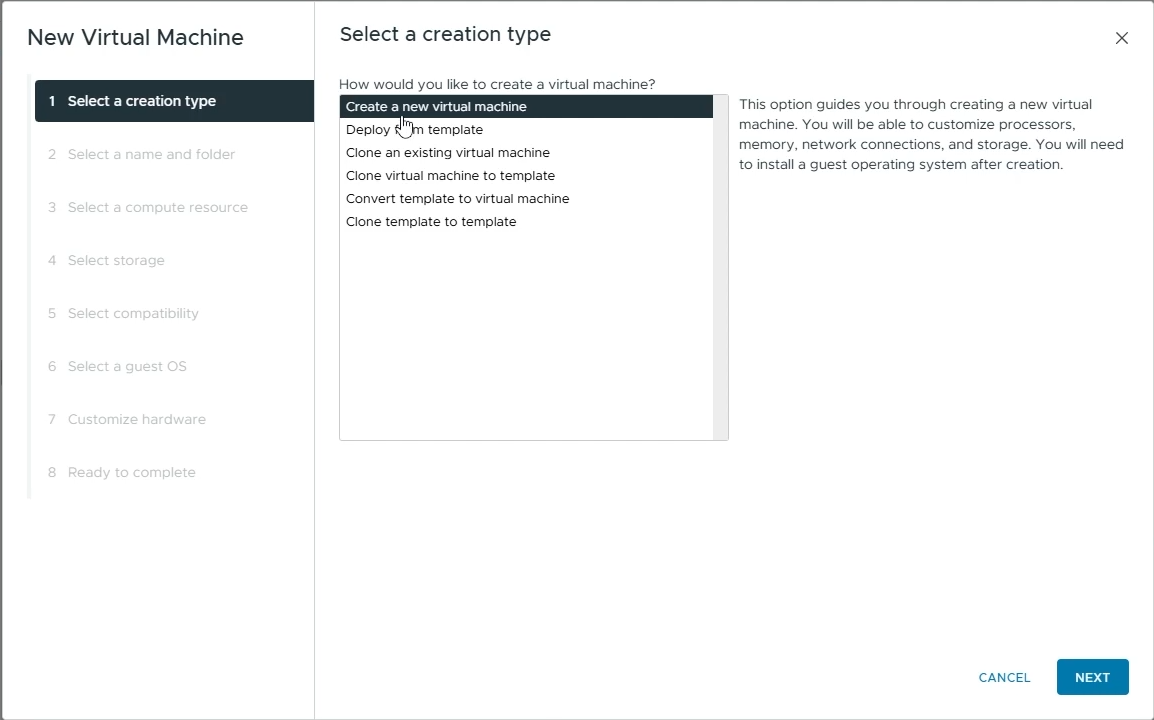
Select “Create a new virtual machine”
Select a name and folder
Virtual machine name: Choose a name for your Virtual Machine (e.g ubuntu-server-kasm-template)
Choose the location where you want to provision this VM.
Click “Next”
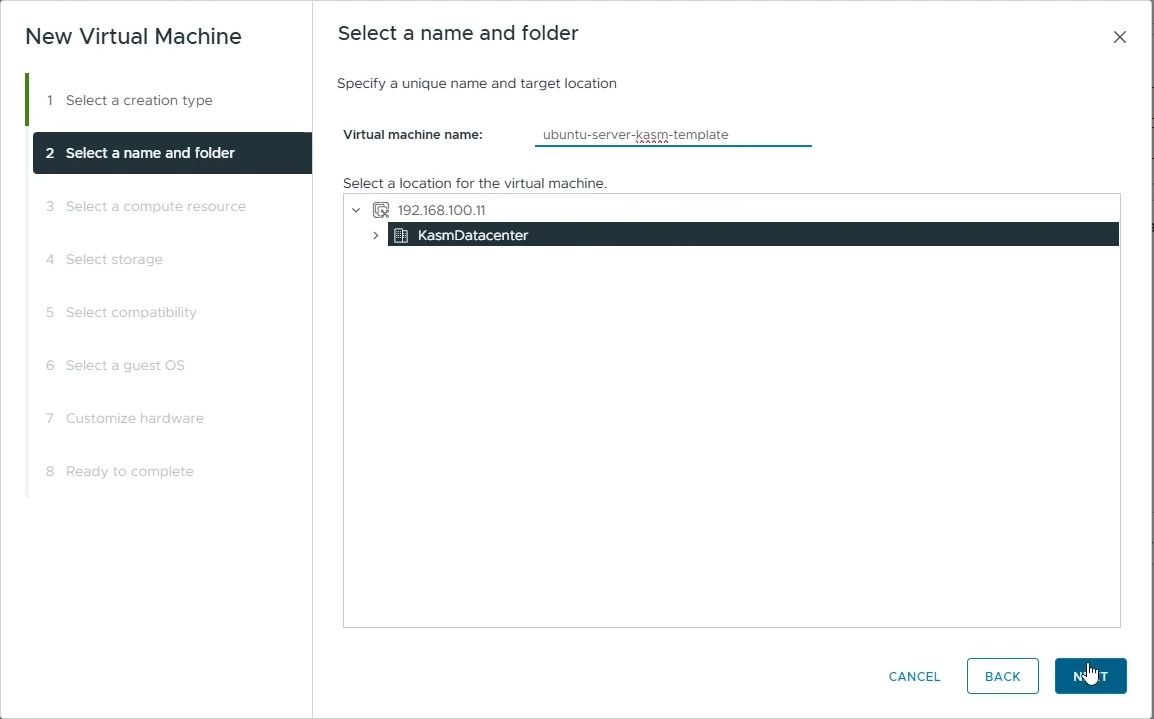
Name your VM”
Select a compute resource
Select the destination compute resource for creating this VM
Click “Next”
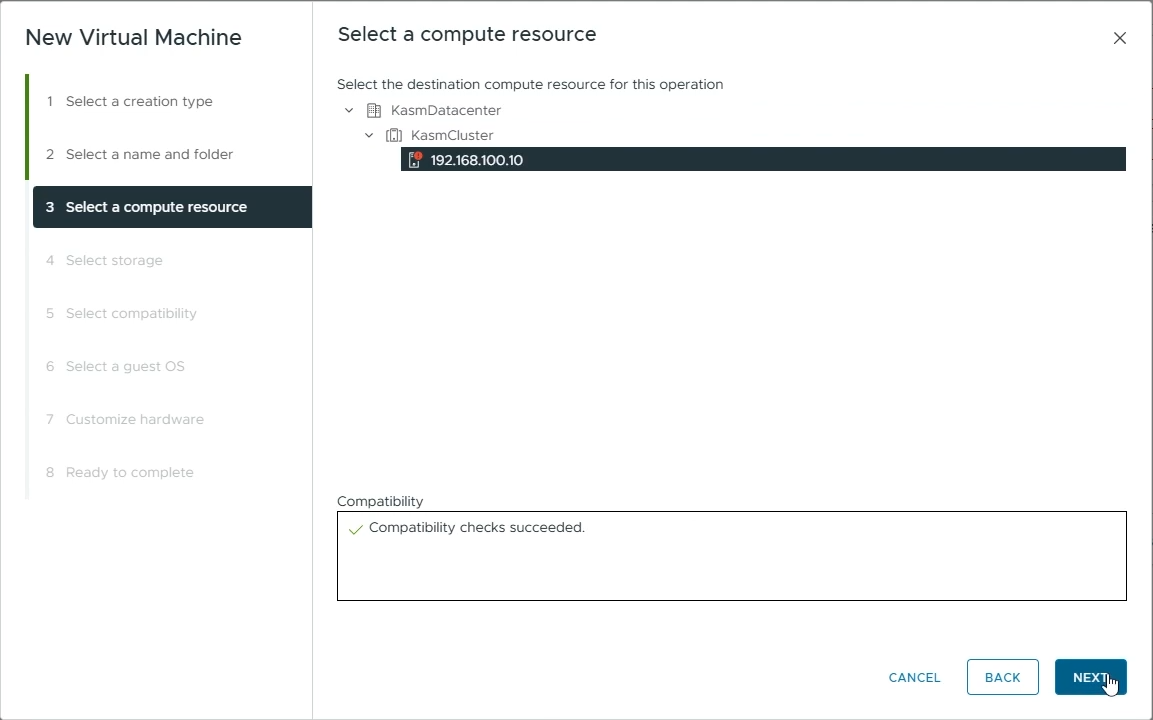
Choose the destination compute resource
Select storage
Choose the datastore you want to use for this VM (e.g datastore1)
Click “Next”
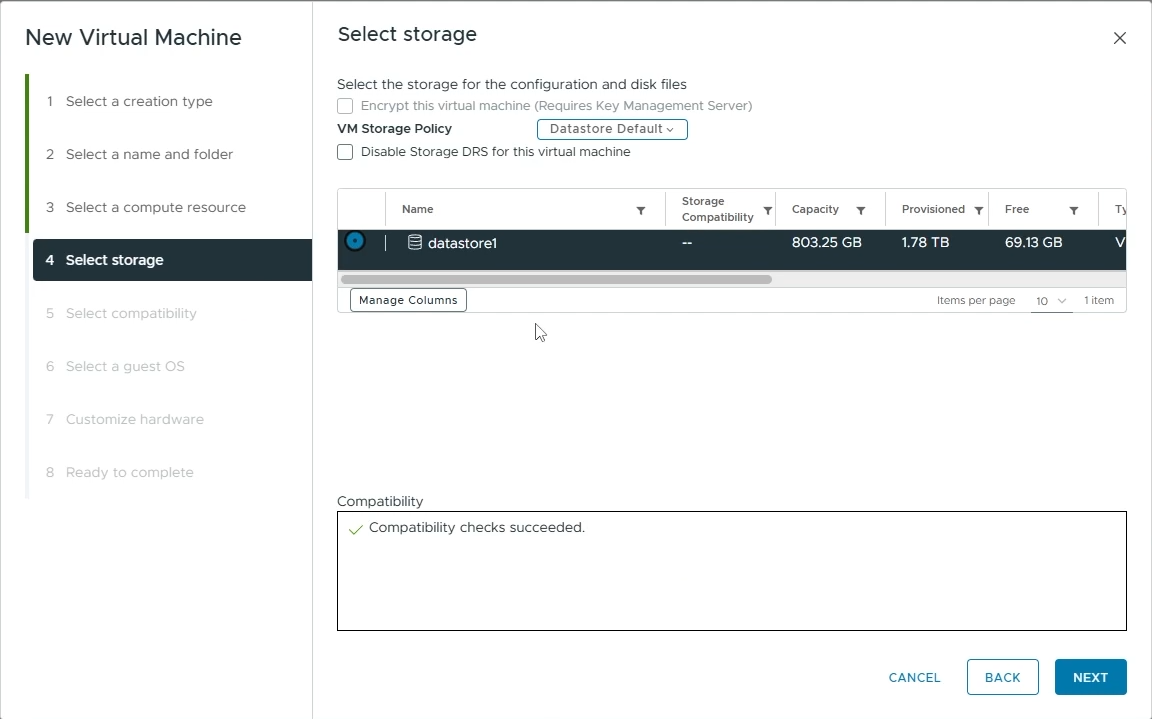
Choose the datastore for your VM
Select compatibility
Select the appropriate compatibility for your VM (e.g ESXi 8.0 U2 and later)
Click “Next”
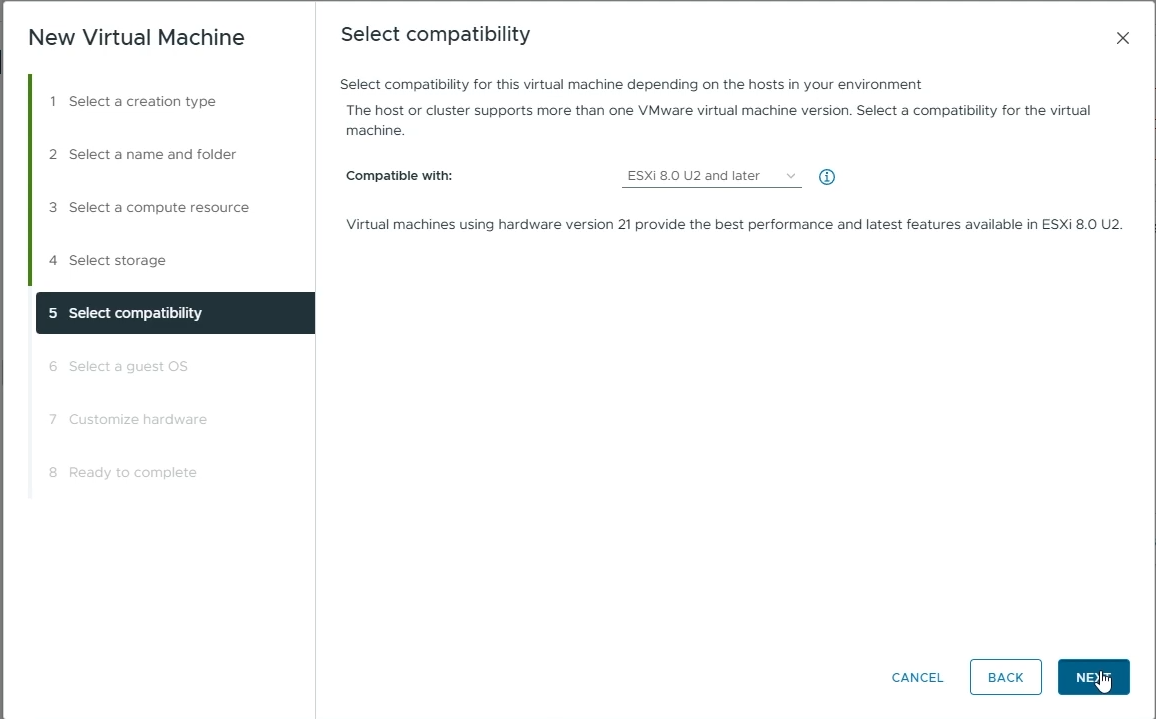
Choose the appropriate compatability for your VM
Select a guest OS
Guest OS Family: Set to “Linux”
Guest OS Version: Set to “Ubuntu Linux (64-bit)”
Click “Next”
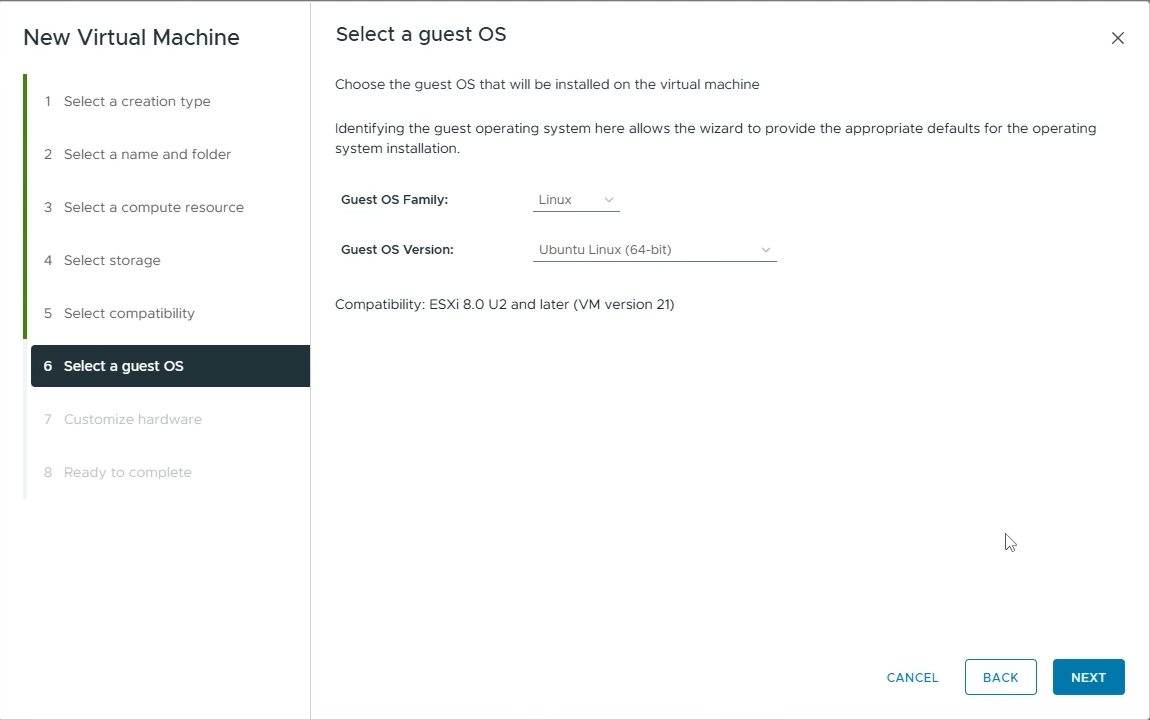
Choose the Guest OS for your VM
Customize hardware
CPU: Set to the number of cores you want to allocate to your VM (e.g 4)
Memory: Set to the amount of memory you want to allocate to your VM (e.g 8 GB)
New Hard disk: Set to the amount of disk size you want to allocate to your hard disk. This depends on how many workspace images you plan on hosting on your agents. The more images, the more disk space you’ll need.
New CD/DVD Drive: Choose “Datastore ISO File” and then select the Linux ISO file you uploaded.
Enable “Connect At Power On”
Click “Next”
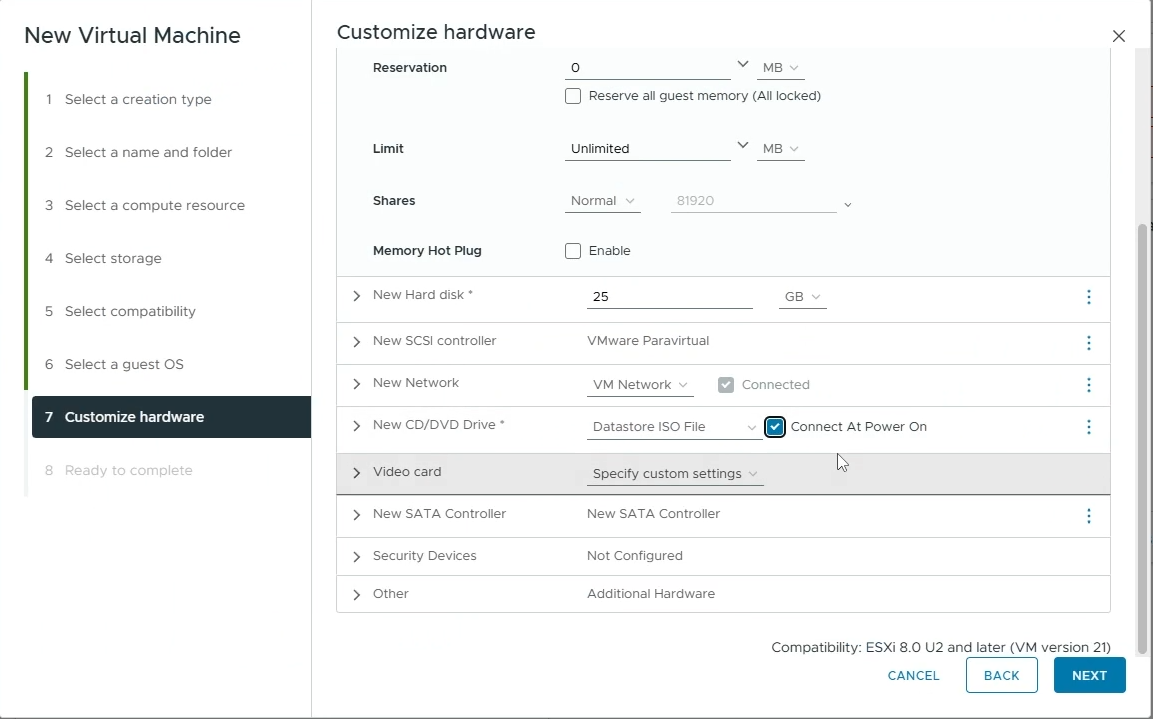
Customize your VM hardware
Read to complete
Verify all your settings and click “Finish” to create your VM.
Power On your VM
Launch a Web Console to interact with your VM and install Ubuntu on it
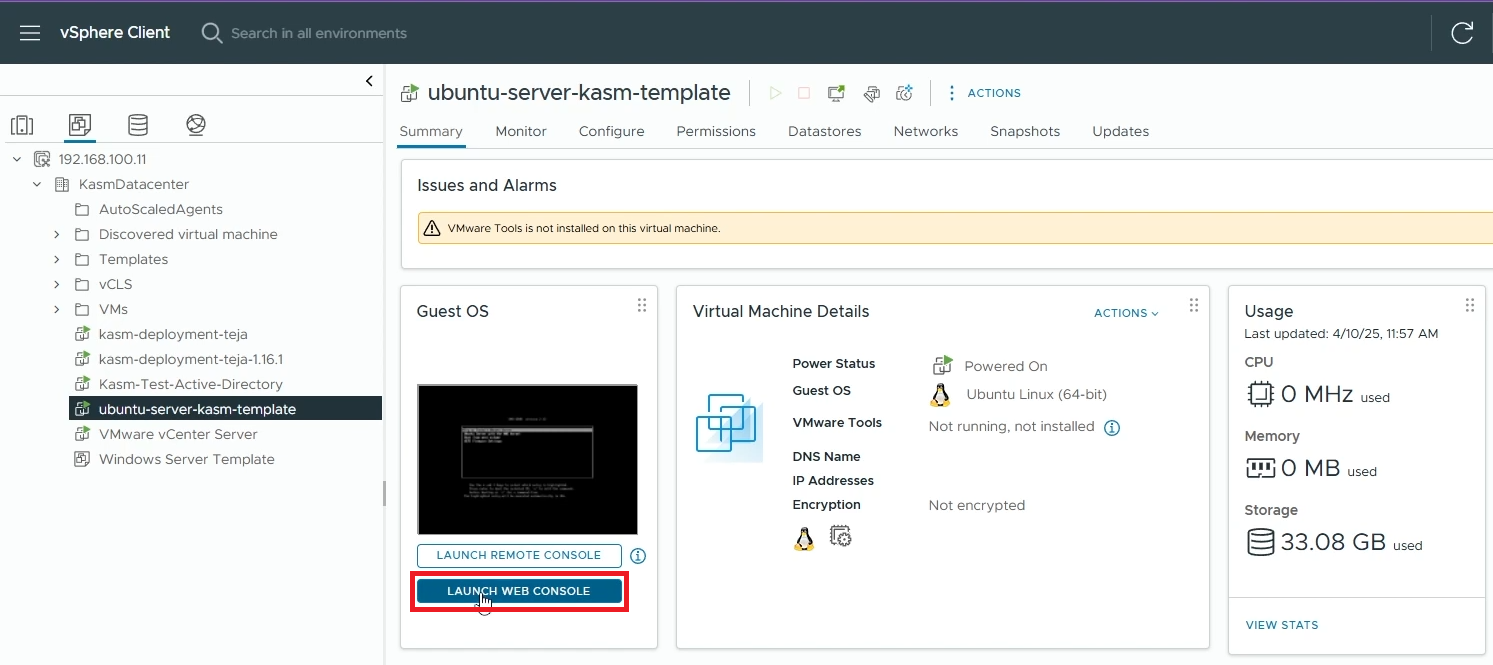
Launch a Web Console
Follow the On-Screen instructions to install Ubuntu Server on your VM
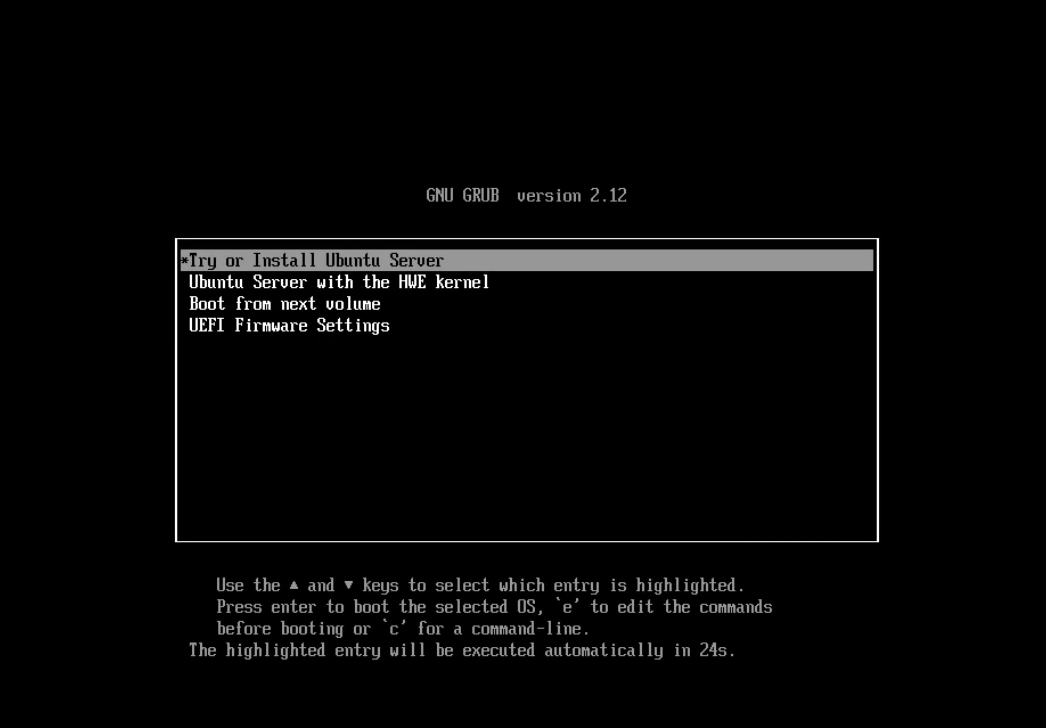
Install Ubuntu Server on your VM
PRO TIP: Enable “Install OpenSSH Server” while installing Ubuntu so that you can connect to your VM easily with SSH later.
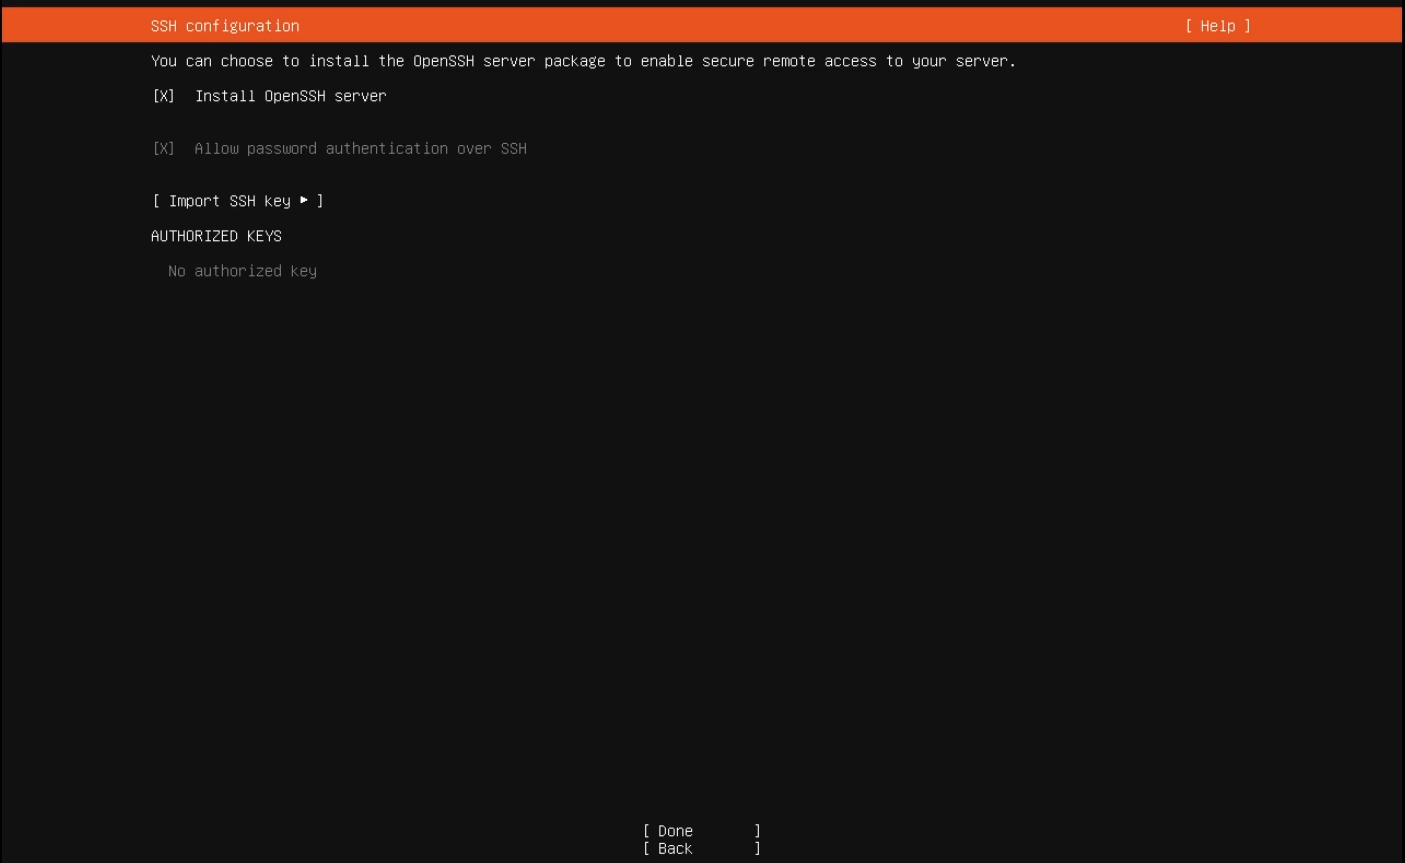
Enable “Install OpenSSH server”
Once Ubuntu is installed, reboot your VM and while your VM reboots, go back to your VM settings and remove the “CD/DVD drive 1” to remove the installation ISO image from your VM.
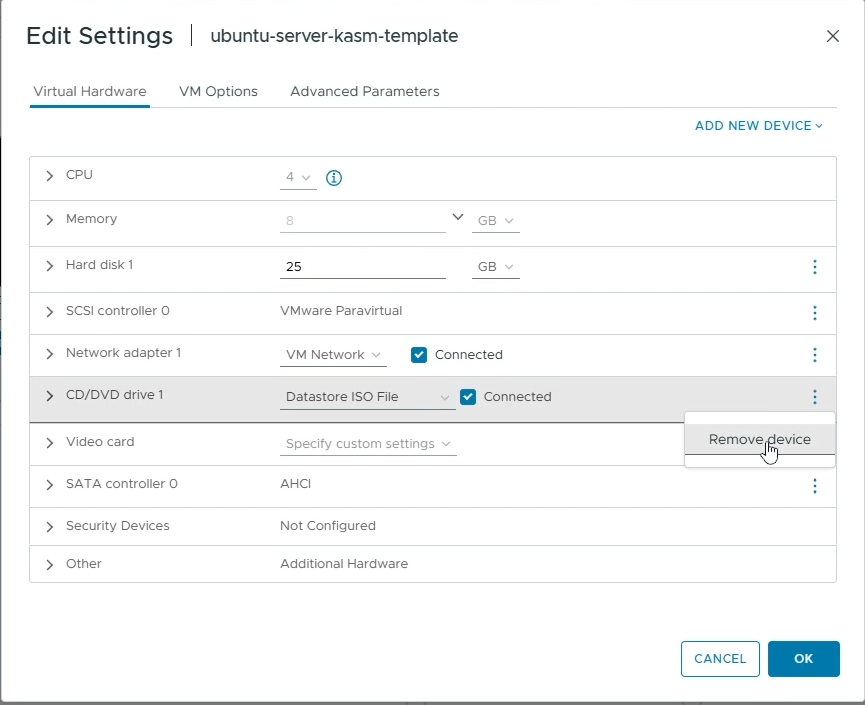
Enable “Remove CD/DVD drive from your VM settings”
You can now SSH into your VM and proceed with the next steps
ssh <your-user>@<your-machine-ip>Install
open-vm-toolsif not already installedsudo apt update sudo apt -y install open-vm-tools
Reboot your VM
Configure the root password for your VM. You will need to input your root credentials to Kasm later so that Kasm can run startup scripts when your autoscaled VMs are provisioned.
sudo passwd root
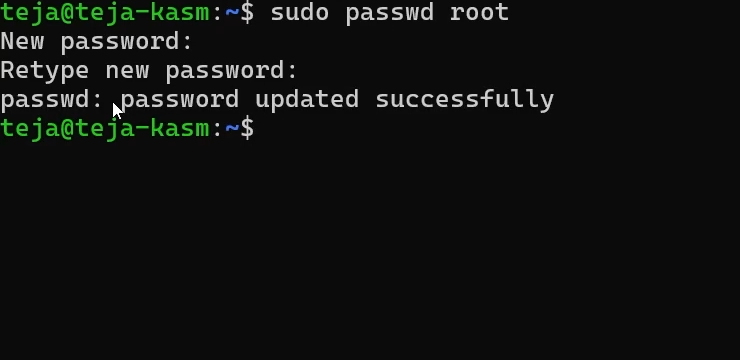
Configure root password for your VM
Optionally, you can pre-load workspace images on your autoscaled agent VMs so that workspaces launch instantly after provisioning, without waiting for Kasm to pull the necessary Docker images. Read the Pre-load Workspace Images on Agents guide to learn more
Power-Off your VM
Once the VM is powered off, right-click on your VM, go to “Template” -> “Convert to Template”
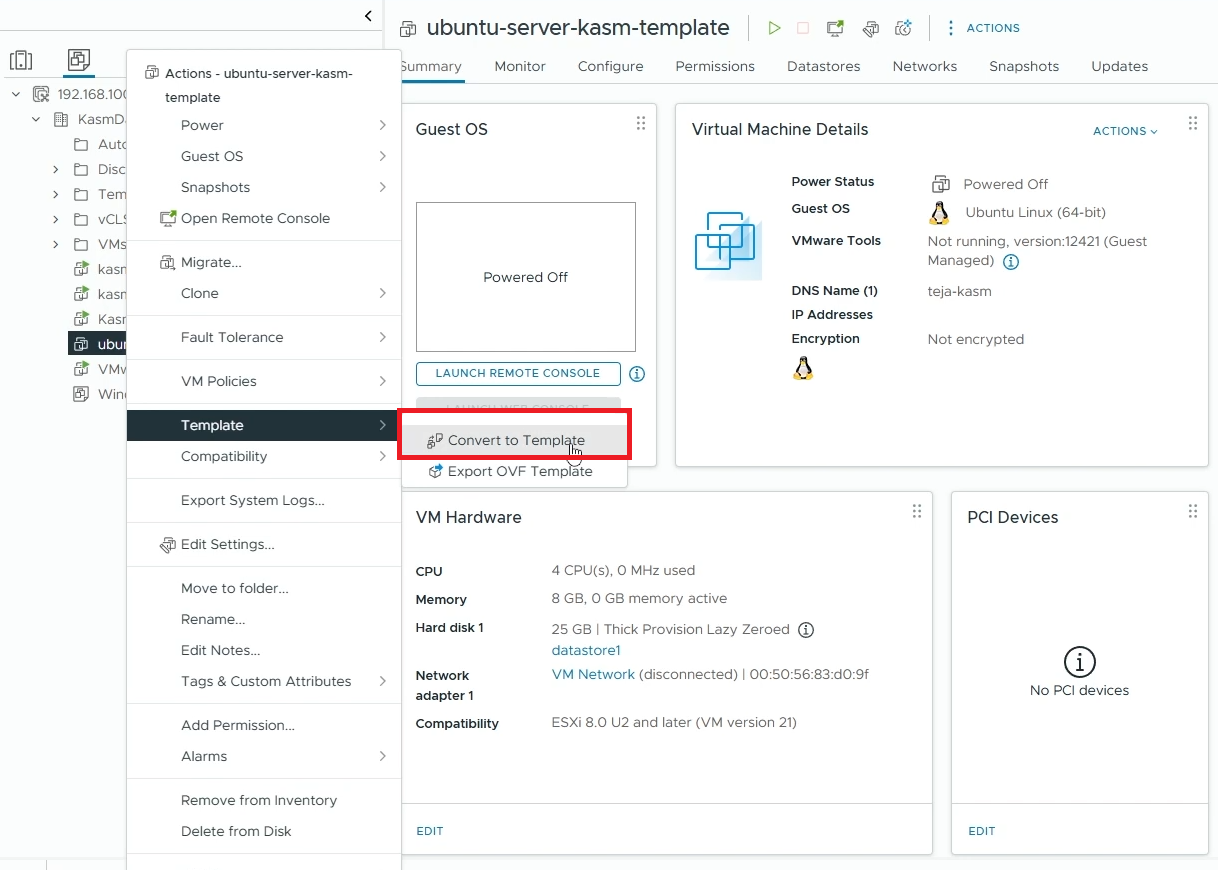
Create a template from your VM
Windows Templating
For an overview of Windows templating and its prerequisites, refer to the Windows AutoScale Template Creation Guide.
On your vSphere dashboard, go to your datastore and upload an ISO file of your Windows Image (you can create a new dedicated folder for storing ISO files). In this demo, we’ll use the Windows Server 2022 installation ISO. If you have a pre-configured Windows template that you’d like to use, upload it instead.
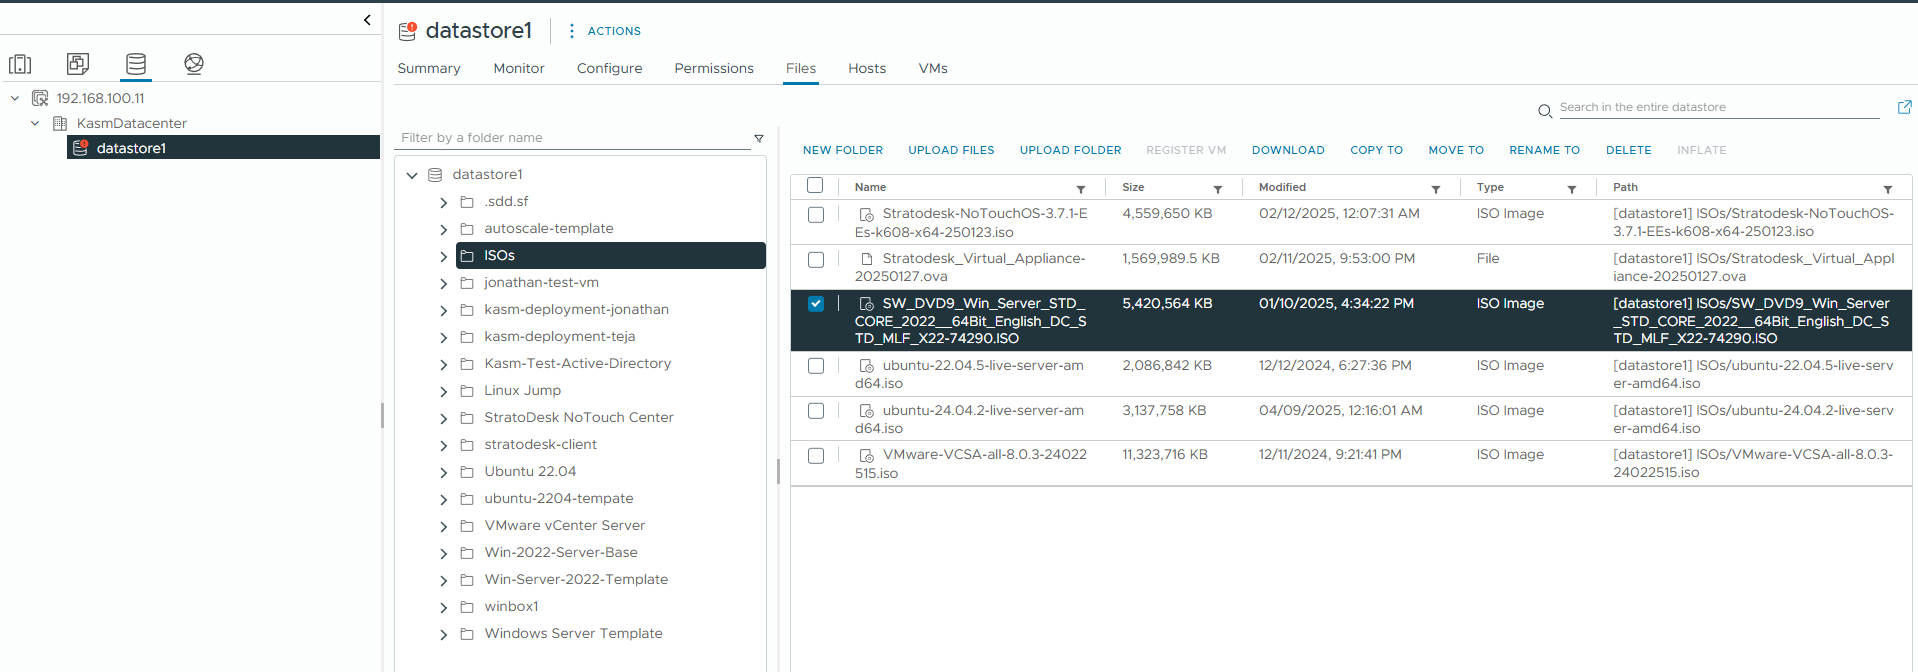
Upload Windows ISO image to your datastore
Go back to your Datacenter, right-click on the datacenter where you want to create a VM and select “New Virtual Machine”
Right-Click on your datacenter and create new VM
Select a creation type
Choose “Create a new virtual machine” and click “Next”
Select “Create a new virtual machine”
Select a name and folder
Virtual machine name: Choose a name for your Virtual Machine (e.g Win-Server-2022-Template)
Choose the location where you want to provision this VM.
Click “Next”
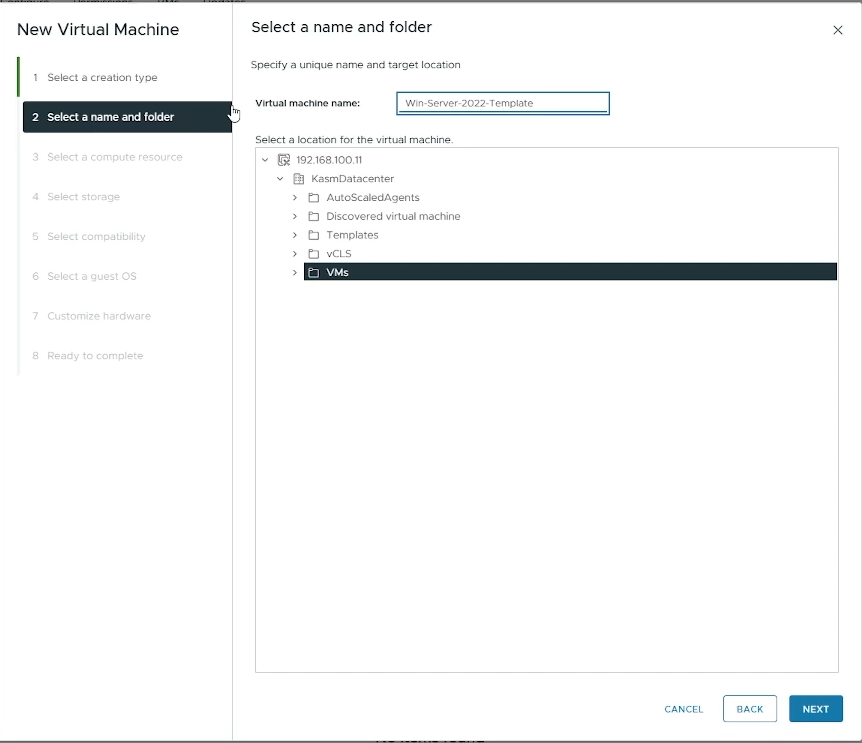
Name your VM
Select a compute resource
Select the destination compute resource for creating this VM
Click “Next”
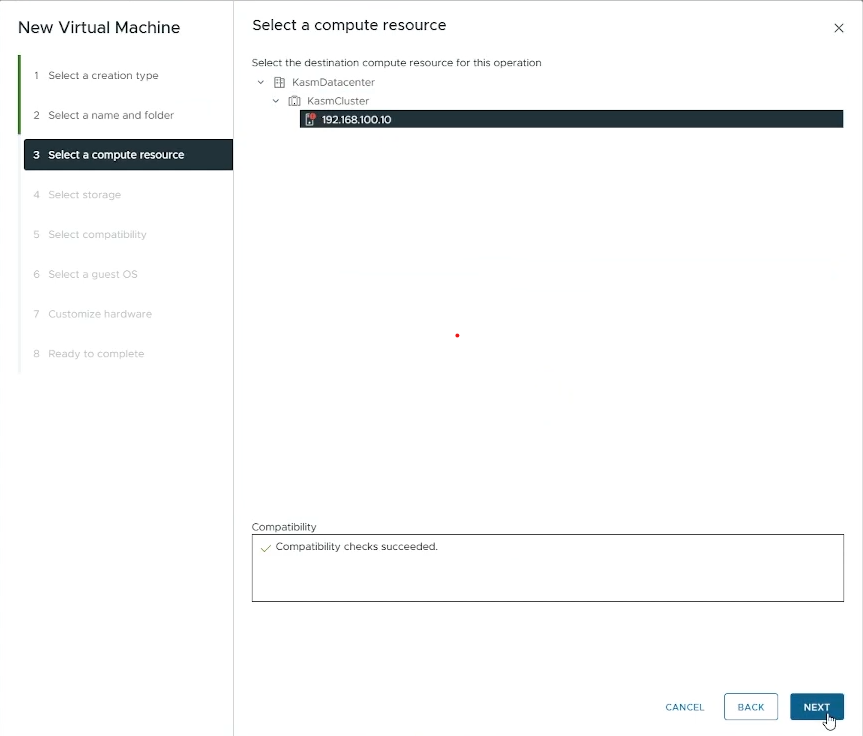
Choose the destination compute resource
Select storage
Choose the datastore you want to use for this VM (e.g datastore1)
Click “Next”
Choose the datastore for your VM
Select compatibility
Select the appropriate compatibility for your VM (e.g ESXi 8.0 U2 and later)
Click “Next”
Choose the appropriate compatability for your VM
Select a guest OS
Guest OS Family: Set to “Windows”
Guest OS Version: Set to “Microsoft Windows Server 2022 (64-bit)”
Click “Next”
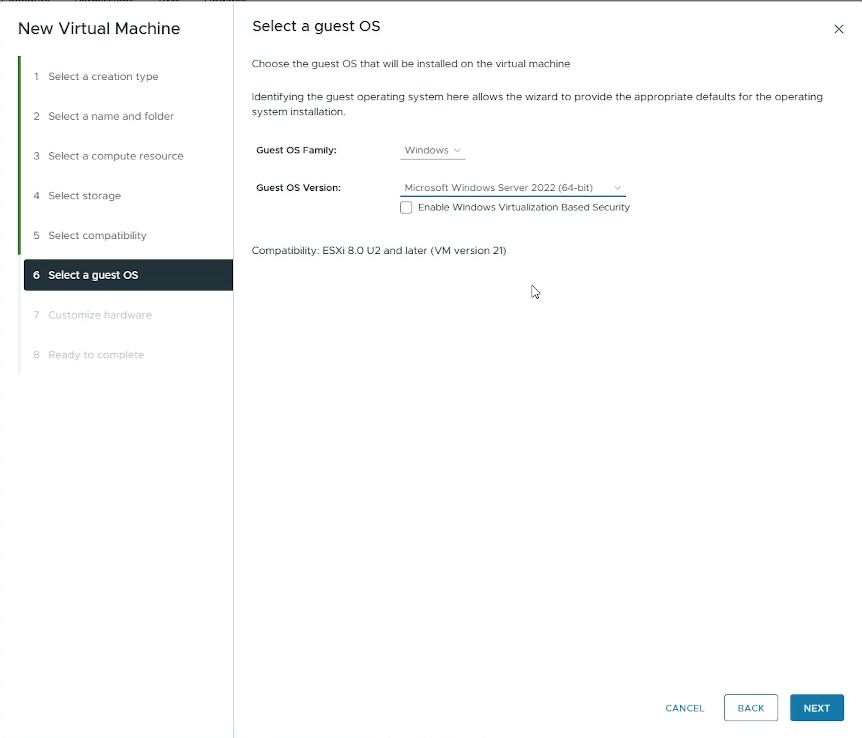
Choose the Guest OS for your VM
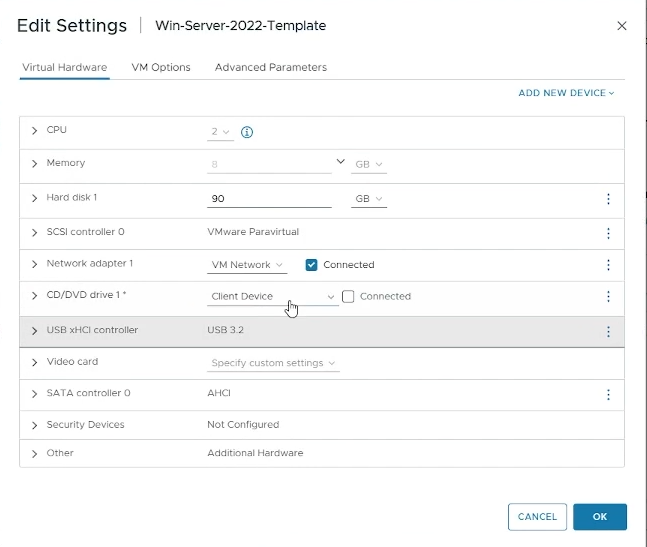
Customize hardware
CPU: Set to the number of cores you want to allocate to your VM (e.g 2)
Memory: Set to the amount of memory you want to allocate to your VM (e.g 8 GB)
New Hard disk: Set to the amount of disk size you want to allocate to your hard disk.
New CD/DVD Drive: Choose “Datastore ISO File” and then select the Windows ISO file you uploaded.
Enable “Connect At Power On”
Click “Next”
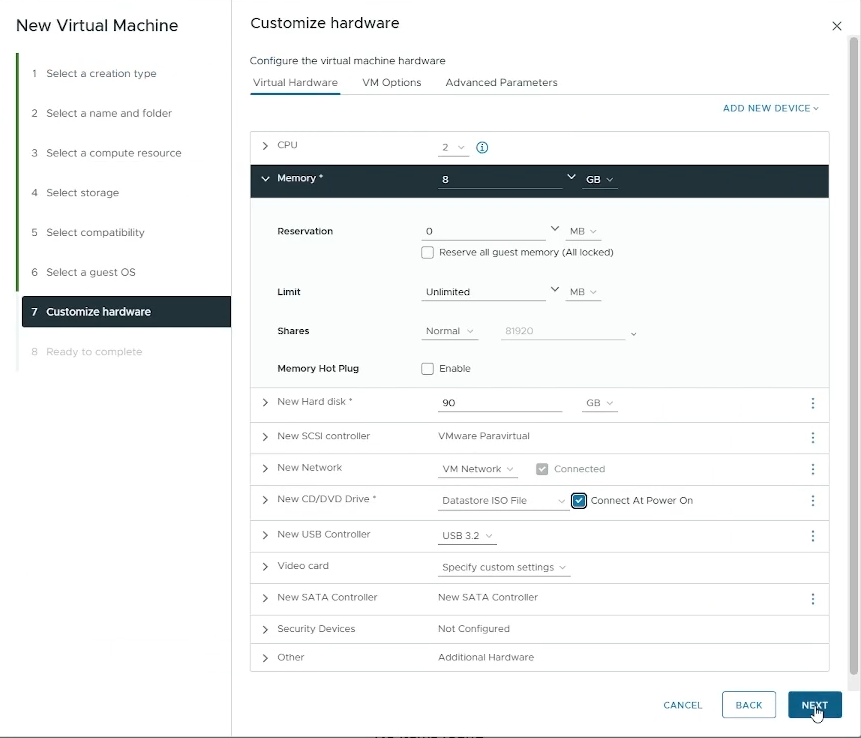
Customize your VM hardware
Read to complete
Verify all your settings and click “Finish” to create your VM.
Power On your VM
Launch a Remote Console to interact with your VM and install Windows on it
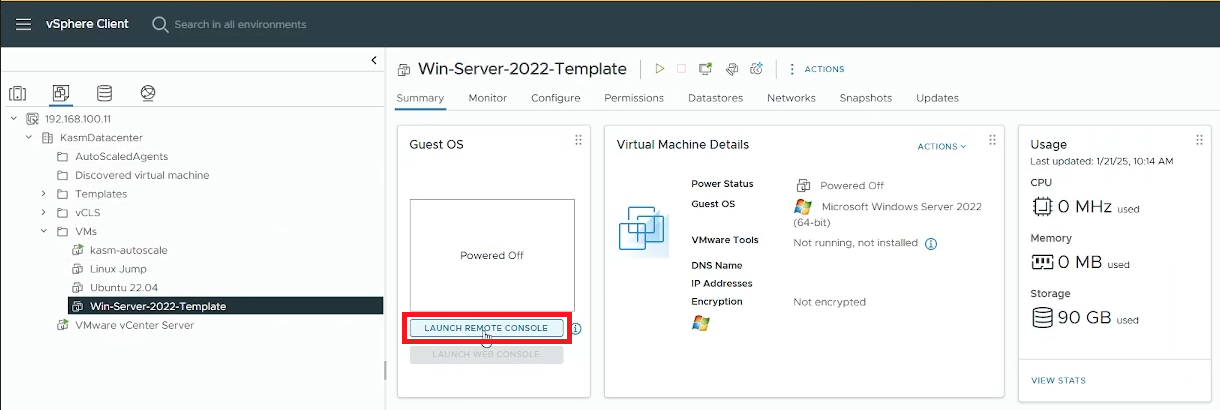
Launch a Console
Follow the On-Screen instructions to install Windows Server on your VM
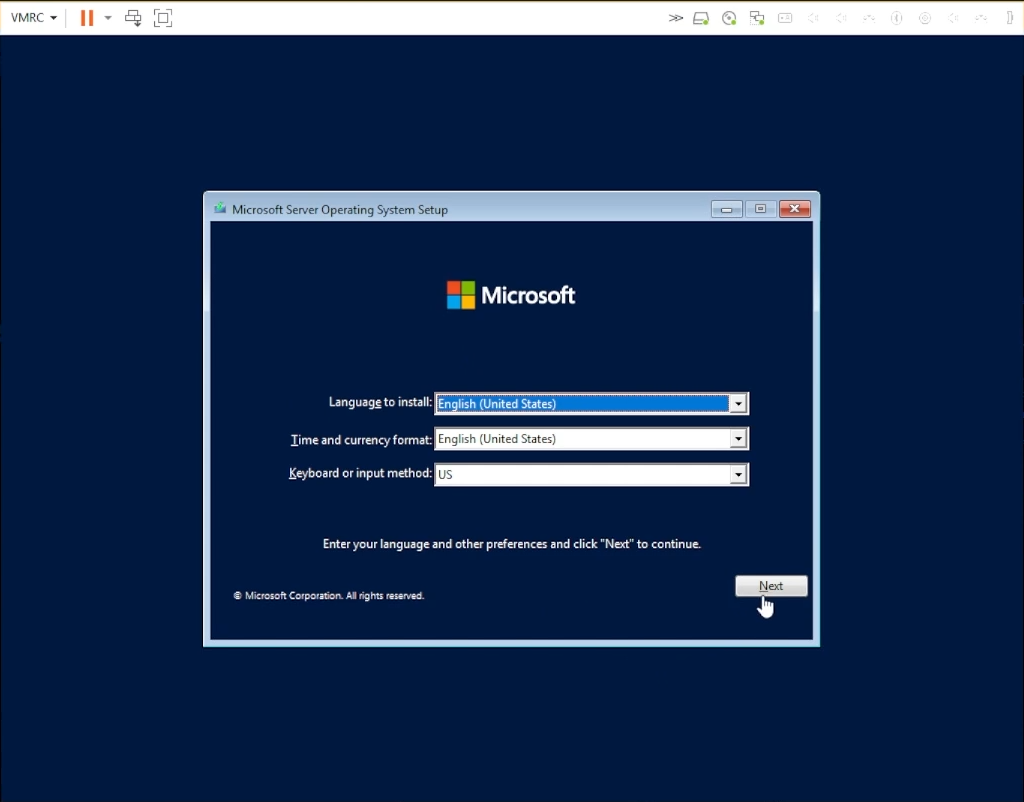
Install Windows on your VM
Select “Desktop Experience” so that your users will be able to use the Desktop environment
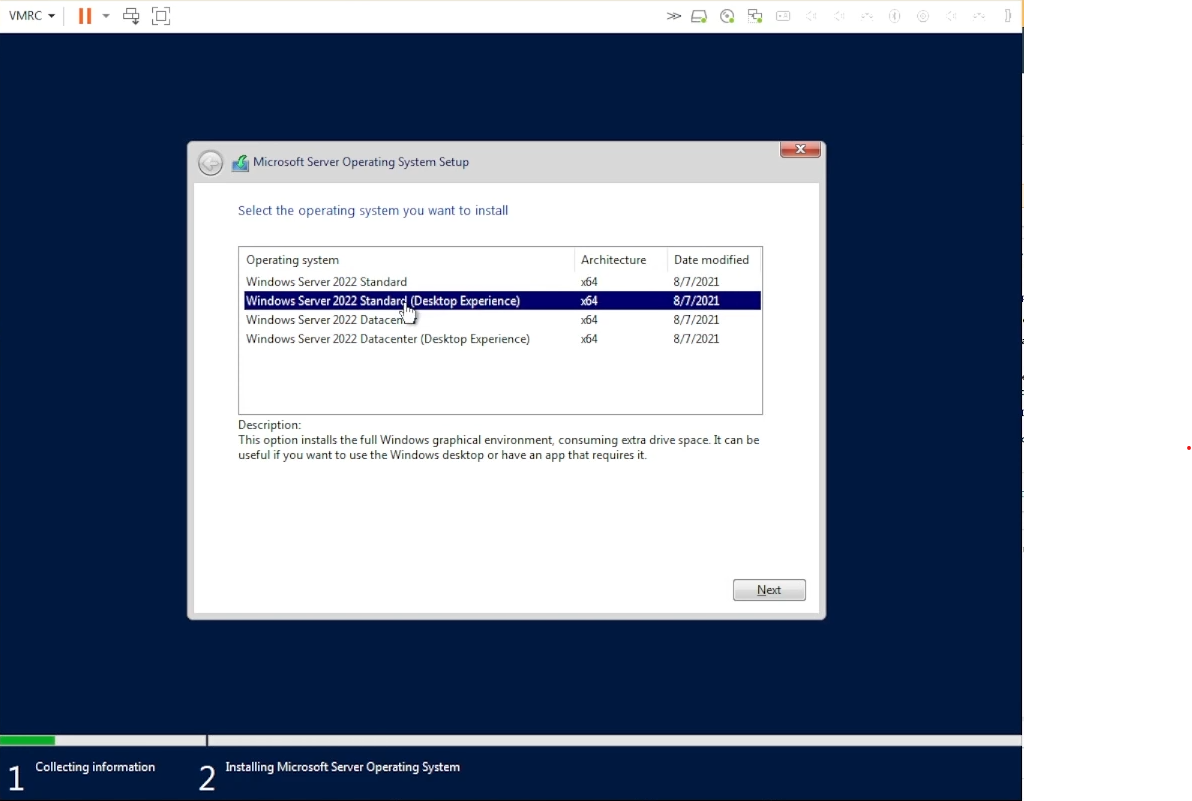
Select Desktop Experience”
Choose the drive where you want to install Windows.
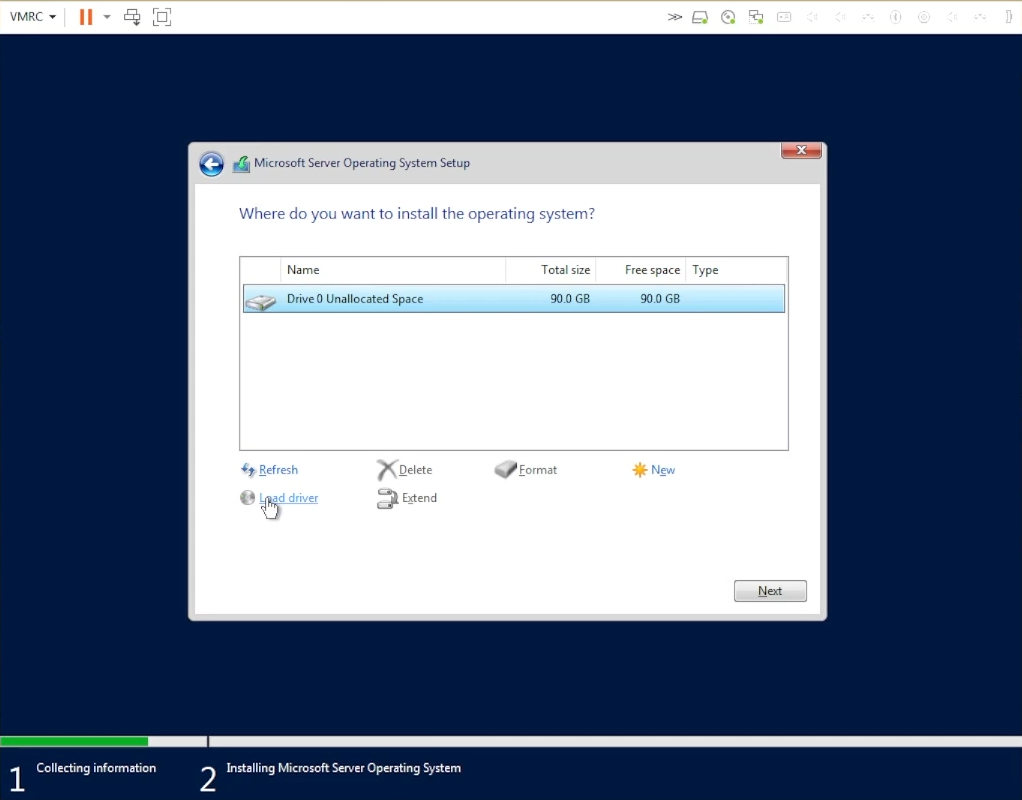
Choose the drive to install Windows
Once Windows is installed, reboot your VM and while your VM reboots, go back to your VM settings and detach the “CD/DVD drive 1” to remove the installation ISO image from your VM.
Detach CD/DVD drive from your VM settings
Launch a Remote or Web Console again to access your VM
Choose an Administrator password for your Windows VM
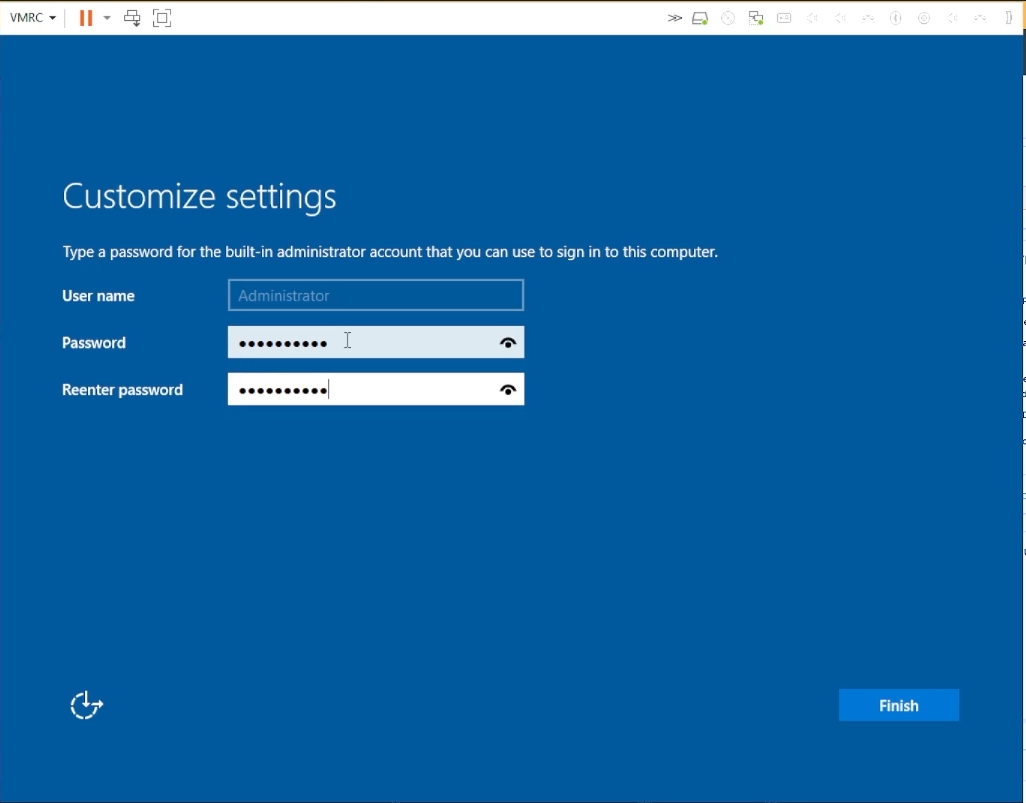
Choose an Administrator Password”
Login to your Windows VM
Install VMWare tools on your Windows VM from vSphere.
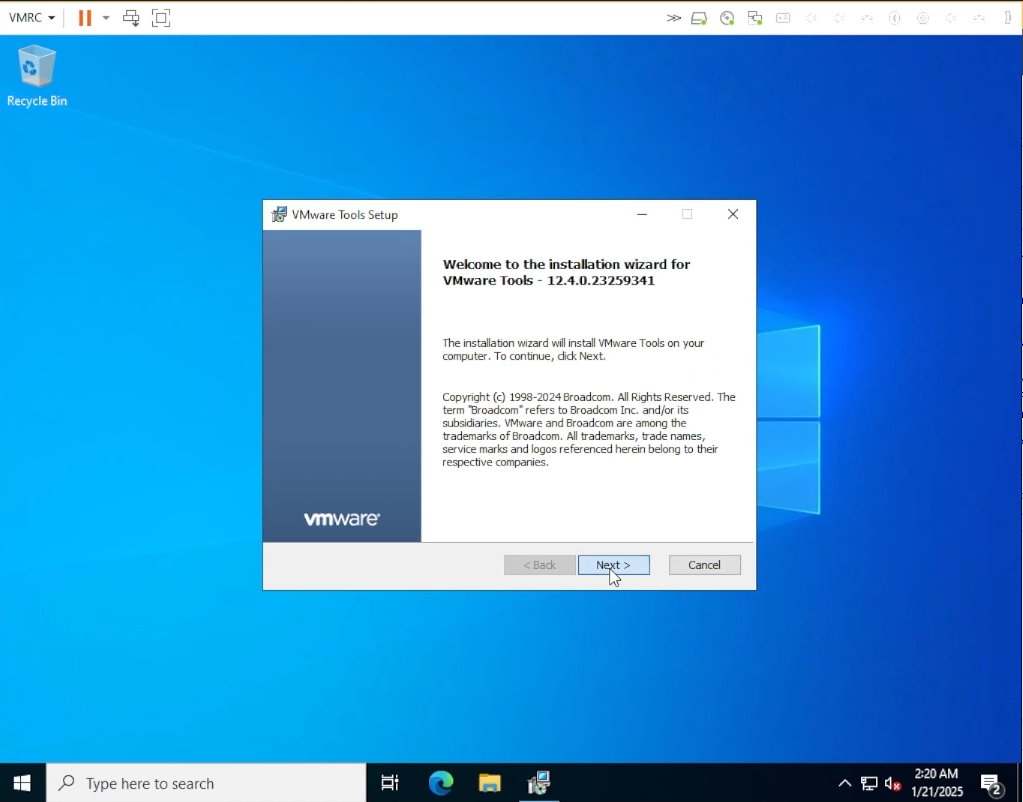
Install VMWare Tools”
Reboot your VM
After rebooting, search for “Remote Desktop Settings” and enable “Remote Desktop”
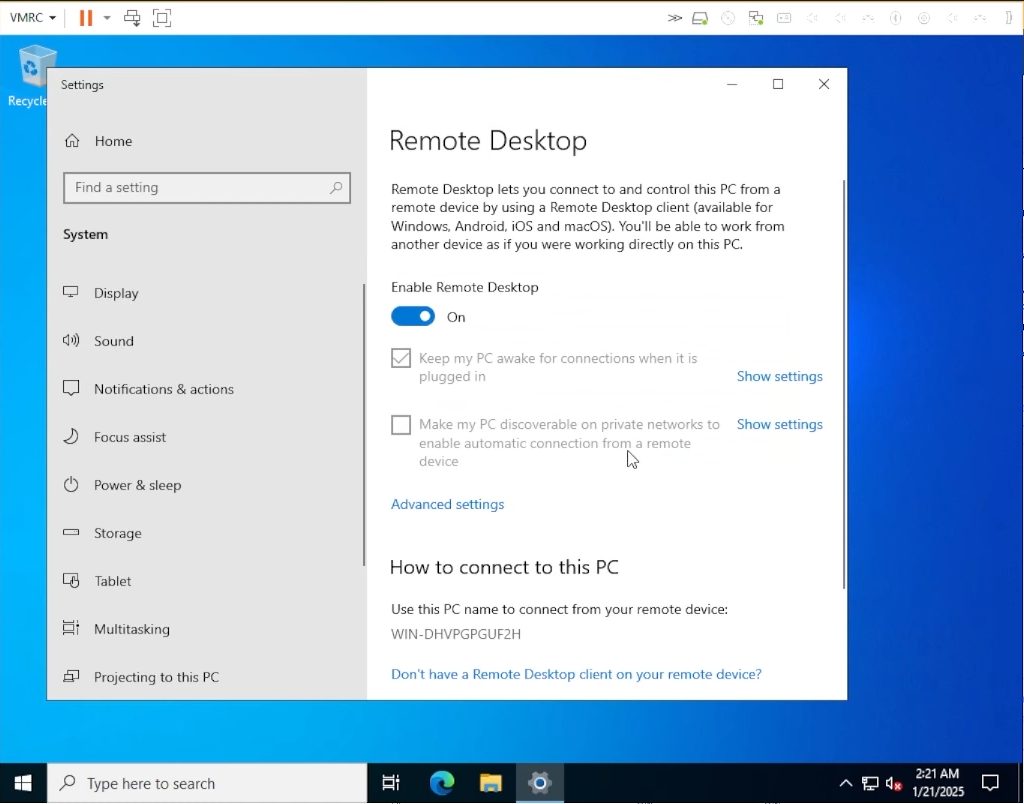
Enable Remote Desktop”
You can now install any software/tools that you would like on your VM (e.g Microsoft Office)
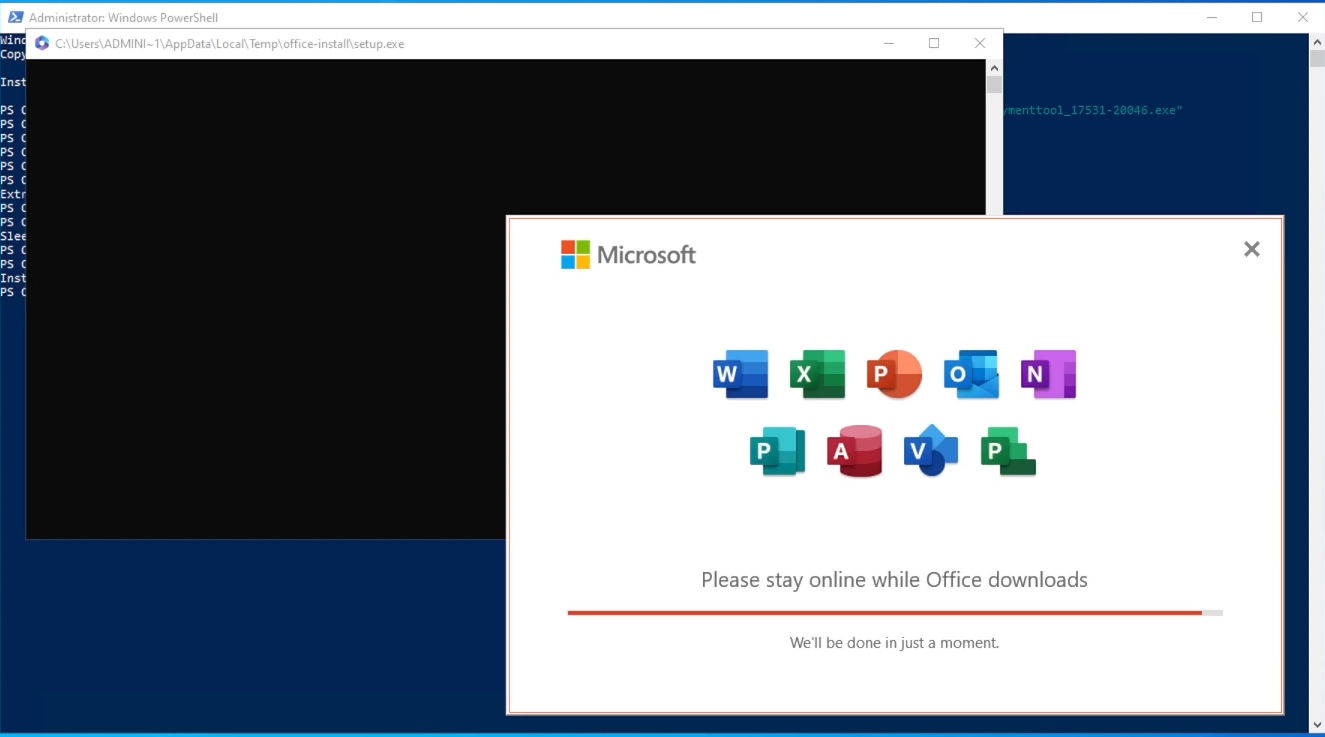
Install software you’d like on your VM”
Shutdown your VM
Once the VM is in powered off state, right-click on it and select “Template” -> “Convert to Template”
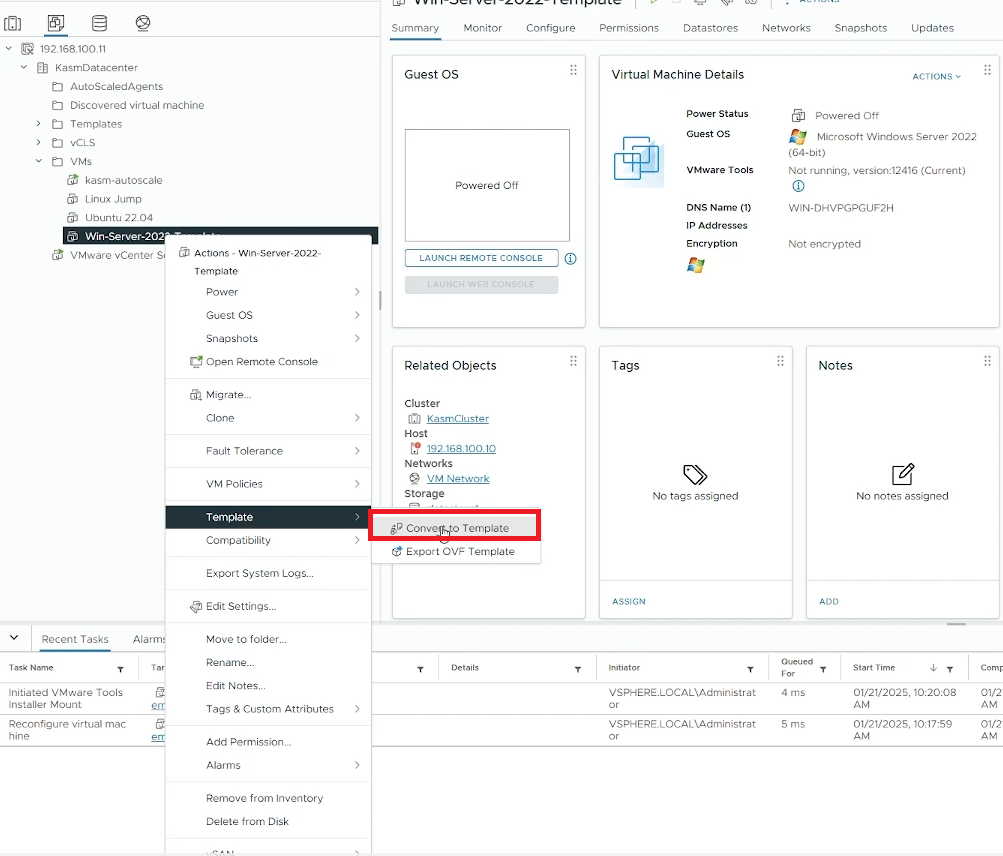
Convert your VM to template”
Configure VM Provider Details on Kasm
Follow AutoScale Settings for Agent Pool or AutoScale Settings for Server Pool to create to create a new AutoScale config, or select Create New in VM Provider Configs if you already have one.
Set Provider to “VMWare Vsphere”
Configure the following settings:
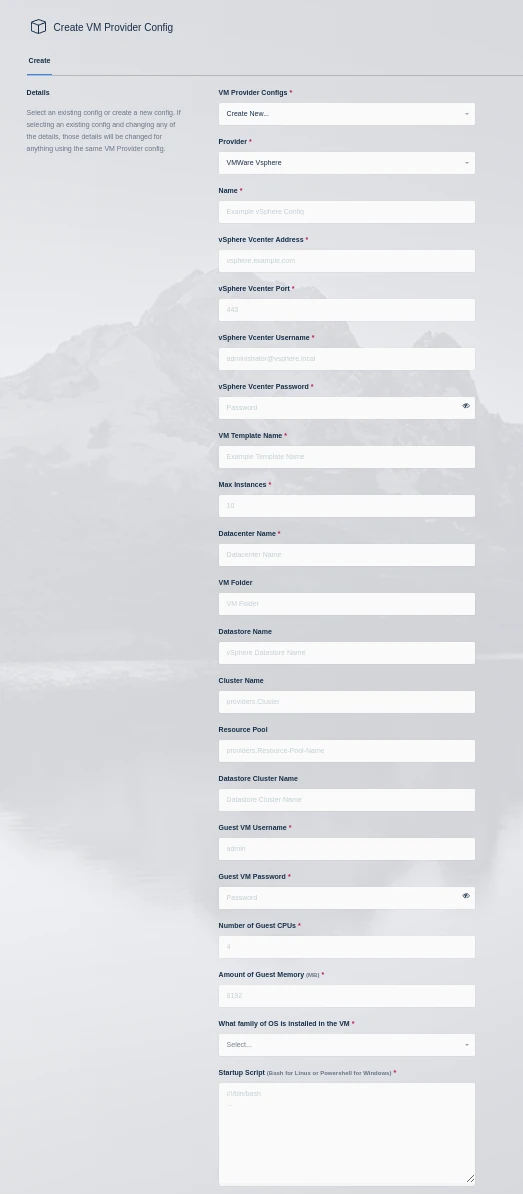
vSphere VM Provider
Setting |
Description |
|---|---|
Name |
An identifying name for this provider configuration. |
vSphere vCenter Address |
The IP or FQDN of the VMware vSphere vCenter server to use. |
vSphere vCenter Port |
The management port of your Vcenter instance (typically 443) |
vSphere vCenter Username |
The username to use when authenticating with the vSphere vCenter server (e.g kasm-autoscale) |
vSphere vCenter Password |
The password to use when authenticating with the vSphere vCenter server. |
VM Template Name |
The name of the template VM to use when cloning new autoscaled VMs. |
Max Instances |
The maximum number of vSphere VM instances to provision regardless of the need for available free slots. |
Datacenter Name |
The datacenter to use for cloning the new vSphere VM instances. |
VM Folder |
The VM folder to use for cloning the new vSphere VM instances. This field is optional, if left blank the VM folder of the template is used. |
Datastore Name |
The datastore to use for cloning the new vSphere VM instances. This field is optional, if left blank the datastore of the template is used. |
Cluster Name |
The cluster to use for cloning the new vSphere VM instances. This field is optional, if left blank the cluster of the template is used. |
Resource Pool |
The resource pool to use for cloning the new vSphere VM instances. This field is optional, if left blank the resource pool of the template is used. |
Datastore Cluster Name |
The datastore cluster to use for cloning the new vSphere VM instances. This field is optional, if left blank the datastore cluster of the template is used. |
Guest VM Username |
The username to use for running the startup script on the new vSphere VM instance. This account should have sufficient privileges to execute all commands in the startup script. |
Guest VM Password |
The password for the Guest VM Username account. |
Number of Guest CPUs |
The number of CPUs to configure on new vSphere VM instances. This option is not dependent on the number of CPUs configured on the template. |
Amount of Guest Memory(GiB) |
The amount of memory in GibiBytes to configure on new vSphere VM instances. This option is not dependent on the amount of memory configured on the template. |
What family of OS is installed in the VM |
Whether the template OS is Linux or Windows. This is needed to ensure proper execution of the startup script. |
Startup Script |
When instances are provisioned, this script is executed and is responsible for installing and configuring the Kasm Agent. Scripts are run as bash scripts on a Linux host and Powershell scripts on a Windows host. Example scripts are available on our GitHub repository Additional troublshooting steps can be found in the Creating Templates For Use With The VMware vSphere Provider section of the server documentation. |
Submit the Provider Config
Note
When configuring VMware vSphere with Kasm Workspaces, one important item to keep in mind is datastore storage. When clones are created VMware will attempt to satisfy the clone operation if the datastore runs out of space, any VMs that are running on that datastore will be paused until space is available. Kasm Workspaces recommends that critical management VMs such as the Vcenter server VM and cluster management VMs are on separate datastores that are not used for Kasm autoscaling.
Test your VMWare vSphere Autoscaling setup
If you have configured non-zero Standby/Minimum Available Session values agents should start provisioning immediately. Otherwise, try launching multiple workspaces to increase resource utilization, prompting Kasm to autoscale new agents.
Provision a Workspace
Go to Workspaces > Registry
Make multiple workspaces available
Go to the Workspaces dashboard and launch sufficient workspace sessions to exceed your resource standby thresholds
Monitor the provisioning of new agents by going to “Infrastructure” -> “Agents”
Verify new VM instances in Proxmox
Check Downscaling
Terminate sessions to reduce resource usage
Confirm that Kasm removes agents after the back-off period