Getting Started
Kasm Workspaces provides browser-based access to on-demand containerized desktops and applications.
More information is available at www.kasmweb.com
Issues can be reported on the Kasm Workspaces Issues Page
Standard Installation
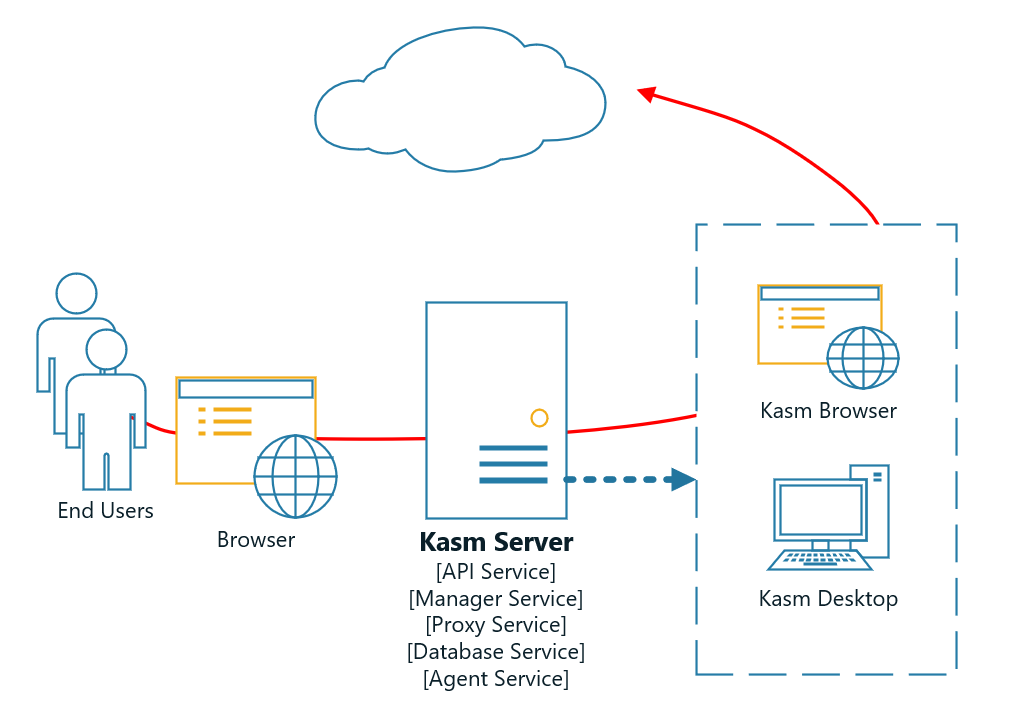
The simplest way to deploy Kasm Workspaces is to install all application services on a single server. End-user sessions will also be provisioned on this server. All interior docker communication occurs within the single server and there are no special configurations required.
Please read through the entire process before getting started.
Troubleshooting info can be found on the Troubleshooting Page
Issues can be reported on the Kasm Workspaces Issues Page

Single Server Architecture
Ports and Protocols
In the Single Server configurations all services communicate via internal docker networks. Only access to the Web Application needs to be exposed.
Source |
Destination |
Port |
Notes |
End User |
Kasm Workspaces |
443 |
Web Application |
System Requirements
Please review the System Requirements before beginning.
Resource Allocation
Administrators can configure sessions to provision with any amount of cpu or memory allocations by editing the in the Kasm Image Settings. However, even a host with more than enough system memory can run into stability issues without enabling a swap partition. For this reason, the Kasm installation requires a swap partition to be present.
Warning
Install Swap partition for best stability of end user sessions. For additional details on docker resource constraints see the following link: Docker Resource Constraints
Creating A Swap Partition
A swap partition can be automatically created by our installation script if the system is lacking one using the “-J” flag with a value in megabytes (IE -J 4096 for 4 gigabytes).
For general information on swap partitions check out the Ubuntu Documentation
The following steps will create a 1 gigabyte (1024MB) Swap partition. It is recommended to allocate 1 gigabyte per concurrent session you expect to run at any given time. Please adjust according to your needs.
sudo dd if=/dev/zero bs=1M count=1024 of=/mnt/1GiB.swap
sudo chmod 600 /mnt/1GiB.swap
sudo mkswap /mnt/1GiB.swap
sudo swapon /mnt/1GiB.swap
Verify swap file exists
cat /proc/swaps
To make the swap file available on boot
echo '/mnt/1GiB.swap swap swap defaults 0 0' | sudo tee -a /etc/fstab
Installation Guide
Download the latest version of Kasm Workspaces to
/tmpExtract the package and run the installation script.
cd /tmp
curl -O https://kasm-static-content.s3.amazonaws.com/kasm_release_1.11.0.18142e.tar.gz
tar -xf kasm_release*.tar.gz
sudo bash kasm_release/install.sh
Note
If you have an Activation Key it can be passed to the installation script and activation will be completed on your behalf as part of the install.
Create a file for the Activation Key e.g. activation_key.txt and paste in the Activation Key you received in you confirmation email.
When running the install.sh use the parameter -a or --activation-key-file so your command might look something like this sudo bash kasm_release/install.sh -a activation_key.txt.
This will not work with an offline air-gapped install, as Kasm Workspaces must contact an activation server to complete licensing your installation.
In a multi server install this option only applies to the database role.
Note
If you would like to run the Web Application on a different port pass the -L flag when calling the installer.
e.g sudo bash kasm_release/install.sh -L 8443
Note
Kasm Workspaces can be installed on an offline system by doing an offline installation. This can be performed by first downloading the Workspace Images and Service Images from the Kasm Downloads and copying them to the system.
The path to the Service Images can be passed to the installer with the -s flag and the path to Workspace Images with the -w flag.
e.g. sudo bash kasm_release/install.sh -w /tmp/kasm_release_workspace_images*.tar.gz -s /tmp/kasm_release_service_images*.tar.gz
This video walks through installing Kasm Workspaces on a single system.
Default Login
Access the Web Application running on port 443 at https://<WEBAPP_SERVER>
Log into the Web Application as the Administrator using the default credentials produced during the install.

Uninstall
Stop All Kasm services.
sudo /opt/kasm/current/bin/stop
Remove any Kasm session containers.
sudo docker rm -f $(sudo docker container ls -qa --filter="label=kasm.kasmid")
Remove Kasm service containers.
export KASM_UID=$(id kasm -u)
export KASM_GID=$(id kasm -g)
sudo -E docker-compose -f /opt/kasm/current/docker/docker-compose.yaml rm
Remove the Kasm docker network.
sudo docker network rm kasm_default_network
Remove the Kasm database docker volume.
sudo docker volume rm kasm_db_1.11.0
Remove the Kasm docker images.
sudo docker rmi redis:5-alpine
sudo docker rmi postgres:9.5-alpine
sudo docker rmi kasmweb/nginx:latest
sudo docker rmi kasmweb/share:1.11.0
sudo docker rmi kasmweb/agent:1.11.0
sudo docker rmi kasmweb/manager:1.11.0
sudo docker rmi kasmweb/api:1.11.0

sudo docker rmi $(sudo docker images --filter "label=com.kasmweb.image=true" -q)
Remove the Kasm installation directory structure.
sudo rm -rf /opt/kasm/
Remove the Kasm User Accounts.
sudo deluser kasm_db
sudo deluser kasm
Documentation:
- Installation
- Upgrade
- Administration
- System Architecture
- Users
- Groups
- Deployment Zones
- Cloud Auto-Scaling
- Login Configurations
- LDAP Authentication
- SAML 2.0 Authentication
- OpenID Authentication
- Two Factor Authentication
- Images
- Agents
- Server Settings
- Kasm Performance
- Database
- Browser Isolation
- Kasm Squid
- Reporting and Logging
- Troubleshooting
- Web Filtering
- Session Staging
- Session Casting
- Session Sharing
- How-To Guides
- Replacing Self-Signed Certificates
- Client Debugging Information
- Reverse Proxy
- Persistent Profiles
- Persistent Data
- Organizr
- Custom Branding
- Image Maintenance
- Building Custom Images
- Listening Port
- Cisco Umbrella / OpenDNS
- Custom DNS Servers
- Custom Root Certificates
- Bridged Network Source NAT
- GPU Acceleration
- Direct To Agent
- Other Operating Systems
- Open-In Kasm Browser Extension
- Using Docker in a Kasm Desktop
- Running Workspaces as Root
- Admin Account Recovery
- Sizing and Deployment Guide
- Chrome Managed Policies
- Running Kasm with Tailscale
- Configuring an External Proxy
- Standalone Remote Database
- VPN Sidecar Containers
- IME Support
- Developers
- Licensing
- Glossary
- Release Notes
- Frequently Asked Questions