Multi Server Installation
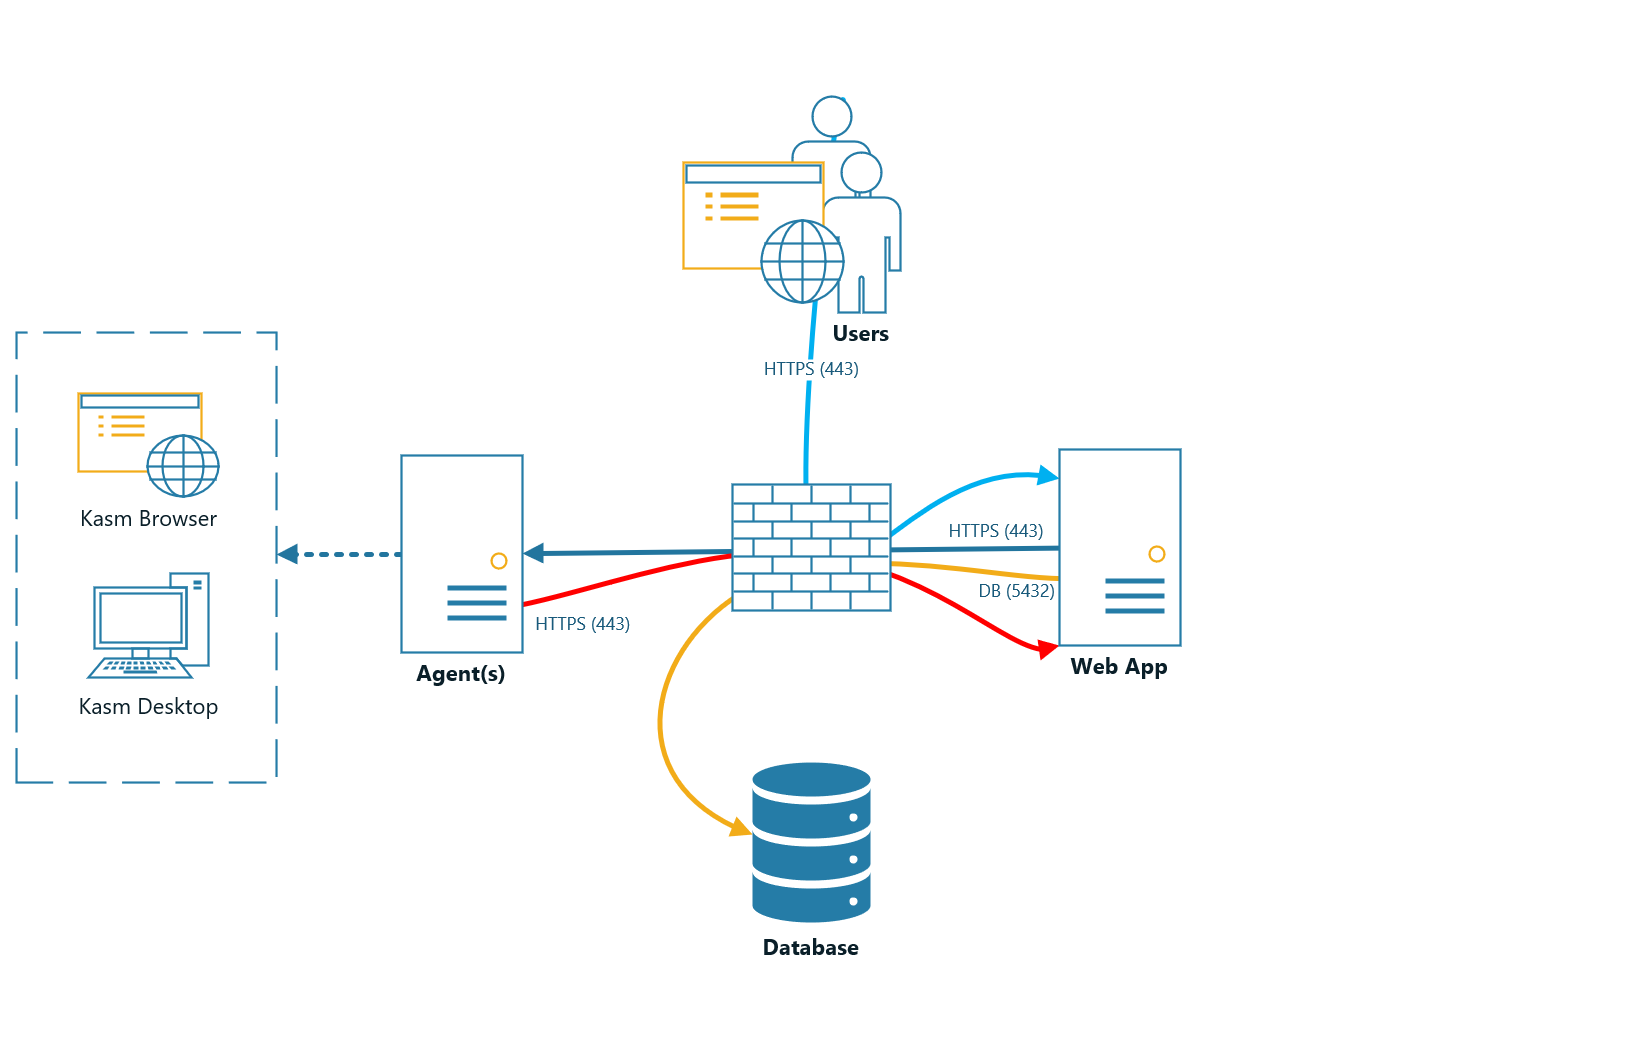
In this example, the Kasm services are installed on different servers within the environment. Depending on the desired use case, these servers can be put in separate network enclaves according to your environment and typical security best practices.
Please read through the entire process before getting started.
Troubleshooting info can be found on the Troubleshooting Page
Issues can be reported on the Kasm Workspaces Issues Page
Architecture Roles
The following outlines the Role Service in this architecture. The ports and protocols required for communication are listed to allow for firewalls or filtering devices in your environment
Web App Server(s)
This is the landing point for end users. If end-users access this server from the internet this may be put in a DMZ enclave. This Server includes the following services:
Web Application Web application (kasm_api)
Manager Service (kasm_manager)
Proxy (kasm_proxy)
Ports / Protocols
HTTPS (443)
Database Server
The database server must be accessible by API and Management Services. This Server includes the following services:
Database Service (kasm_db)
Share Database Service (kasm_redis)
Ports / Protocols
POSTGRESQL (5432)
REDIS (6379)
Agent Server(s)
Ports / Protocols
HTTPS (443)

Ports and Protocols
Source |
Destination |
Port |
Notes |
End User |
Web App Server |
443 |
Web Application |
Web App Server |
Database Server |
5432,6379 |
Database Access |
Web App Server |
Agent Server |
443 |
Agent Instructions |
Agent Server |
Management Server |
443 |
Check-in, Request Images, Request Authentication |
System Requirements
Please review the System Requirements before beginning.
Resource Allocation
Administrators can configure sessions to provision with any amount of cpu or memory allocations by editing the in the Kasm Image Settings. However, even a host with more than enough system memory can run into stability issues without enabling a swap partition. For this reason, the Kasm installation requires a swap partition to be present.
Warning
Install Swap partition for best stability of end user sessions. For additional details on docker resource constraints see the following link: Docker Resource Constraints
Creating A Swap Partition
A swap partition can be automatically created by our installation script if the system is lacking one using the “-J” flag with a value in megabytes (IE -J 4096 for 4 gigabytes).
For general information on swap partitions check out the Ubuntu Documentation
The following steps will create a 1 gigabyte (1024MB) Swap partition. It is recommended to allocate 1 gigabyte per concurrent session you expect to run at any given time. Please adjust according to your needs.
sudo dd if=/dev/zero bs=1M count=1024 of=/mnt/1GiB.swap
sudo chmod 600 /mnt/1GiB.swap
sudo mkswap /mnt/1GiB.swap
sudo swapon /mnt/1GiB.swap
Verify swap file exists
cat /proc/swaps
To make the swap file available on boot
echo '/mnt/1GiB.swap swap swap defaults 0 0' | sudo tee -a /etc/fstab
Installation Guide
Follow these steps to setup Kasm on separate servers.
Install Database Server Role
The following steps can be followed to install the Database service on the Database Server
Download the latest version of Kasm Workspaces to /tmp
Extract the package and execute the installation. Please note the default login credentials produced during the install.
Note
If you have an Activation Key it can be passed to the installation script and activation will be completed on your behalf as part of the install.
Create a file for the Activation Key e.g. activation_key.txt and paste in the Activation Key you received in you confirmation email.
When running the install.sh use the parameter -a or --activation-key-file so your command might look something like this sudo bash kasm_release/install.sh -a activation_key.txt.
This will not work with an offline air-gapped install, as Kasm Workspaces must contact an activation server to complete licensing your installation.
In a multi server install this option only applies to the database role.
cd /tmp
curl -O https://kasm-static-content.s3.amazonaws.com/kasm_release_1.11.0.18142e.tar.gz
tar -xf kasm_release*.tar.gz
sudo bash kasm_release/install.sh -S db
Note
Kasm Workspaces can be installed on an offline system by doing an offline installation. This can be performed by first downloading the Workspace Images and Service Images from the Kasm Downloads and copying them to the system.
The path to the Service Images can be passed to the installer with the -s flag and the path to Workspace Images with the -w flag.
e.g. sudo bash kasm_release/install.sh -w /tmp/kasm_release_workspace_images*.tar.gz -s /tmp/kasm_release_service_images*.tar.gz
Install Web App Role
The following steps can be followed to provision the Web App components on a single server. Repeat these steps on additional servers to add redundancy and scalability. Utilize a single public DNS name with multiple public IPs to have DNS load distribute requests to the Web App Kasm Workspaces server cluster.
For the next steps you need the following information
DATABASE_HOSTNAME : The IP, hostname or FQDN of the Database Server that is resolvable and reachable by the Web App server.
DATABASE_PASSWORD : The database password generated during the installation of the database.
REDIS_PASSWORD : The Redis password generated during the installation of the database.
Before continuing, verify this server can access port [DATABASE_HOSTNAME]:5432 and 6379
Download the latest version of Kasm Workspaces to /tmp
Extract the package and run execute the installation
cd /tmp
curl -O https://kasm-static-content.s3.amazonaws.com/kasm_release_1.11.0.18142e.tar.gz
tar -xf kasm_release*.tar.gz
sudo bash kasm_release/install.sh -S app -q [DATABASE_HOSTNAME] -Q [DATABASE_PASSWORD] -R [REDIS_PASSWORD]
Note
Kasm Workspaces can be installed on an offline system by doing an offline installation. This can be performed by first downloading the Workspace Images and Service Images from the Kasm Downloads and copying them to the system.
The path to the Service Images can be passed to the installer with the -s flag and the path to Workspace Images with the -w flag.
e.g. sudo bash kasm_release/install.sh -w /tmp/kasm_release_workspace_images*.tar.gz -s /tmp/kasm_release_service_images*.tar.gz
Default Login
Access the Web Application running on port 443 at https://<WEBAPP_SERVER>
Log into the Web Application as the Administrator using the default credentials produced during the install.

Install Agent Server Role(s)
The following steps can be followed to install the Agent and Proxy services. Repeat this step for any additional servers intended to provision end user sessions
For the next steps you need the following information
MANAGER_HOSTNAME : The IP, hostname or FQDN of the Web App Server that is resolvable and reachable by the Agent server.
MANAGER_TOKEN : The manger token generated during the db install. This is used for authentication by the Agent.
AGENT_HOSTNAME : This IP, hostname, or FQDN of this Agent Server that is resolvable and reachable by the Web App Server. This value will be reported by the Agent Service during check in routines and used by other services to communicate with it.
Before continuing, verify this server can access port [MANAGER_HOSTNAME]:443
Download the latest version of Kasm Workspaces to /tmp
Extract the package and execute the installation
cd /tmp
curl -O https://kasm-static-content.s3.amazonaws.com/kasm_release_1.11.0.18142e.tar.gz
tar -xf kasm_release*.tar.gz
sudo bash kasm_release/install.sh -S agent -p [AGENT_HOSTNAME] -m [MANAGER_HOSTNAME] -M [MANAGER_TOKEN]
Note
Kasm Workspaces can be installed on an offline system by doing an offline installation. This can be performed by first downloading the Workspace Images and Service Images from the Kasm Downloads and copying them to the system.
The path to the Service Images can be passed to the installer with the -s flag and the path to Workspace Images with the -w flag.
e.g. sudo bash kasm_release/install.sh -w /tmp/kasm_release_workspace_images*.tar.gz -s /tmp/kasm_release_service_images*.tar.gz
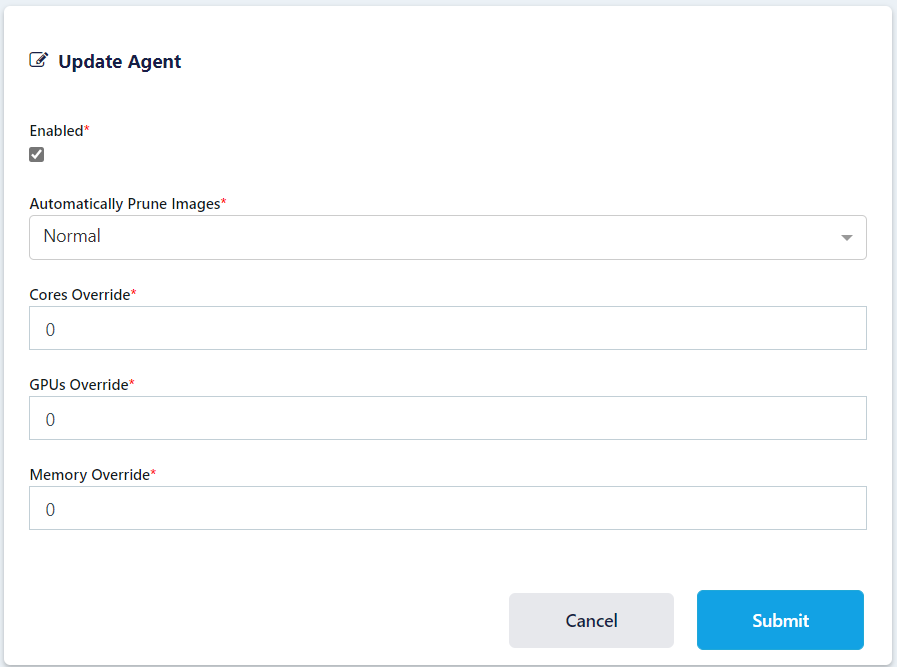
Log into the UI as an Administrator, select Agents and using the three dot menu select edit on the agent you just created. Make sure Enabled is selected and click Submit.

Verify the Agent Service is properly checking into the Manager Service. Log into the UI as an Administrator. Select Agents and verify the Agent is listed with a Last Reported time of less than 1 minute. If the agent has not checked in, it likely can’t resolve or connect to [AGENT_HOSTNAME]:443 . Inspect the logs for details.
sudo tail -f /opt/kasm/current/log/agent.log